About Me ☆

Hello, I am Sami, the Girl behind Guilty Pleasures. I have been
writing tutorials since May 22, 2009. My first tutorial was called Twilight Obsession. How I got my name is simple. I found tagging to be my Guilty Pleasure. I thought it fit perfectly. I am a designer as well. You can find links to my blogs on my top menu. If you have questions please feel free to ask. Other wise you can read more about me on my
ABOUT ME PAGE!
My Blogs☆

Store Manager ☆

CT Manager☆


Favorite Blogs ☆


My Hangouts☆


Wednesday, September 30, 2009
TOU
Updated 12/30/2011
Terms of use for Guilty Pleasures
Please if you have questions or concerns email me.
GuiltyPleasurestt@yahoo.com
Terms of use for Guilty Pleasures
Please if you have questions or concerns email me.
GuiltyPleasurestt@yahoo.com
My TOU is Pretty Simple
1. Not Hot linking
2. DO NOT claim my work as your own.
3. If you want to share my tutorials in a group or forum,
please link them directly to my blog.
4. DO NOT under any circumstances alter or rip apart my tags for any reason.
All tutorials written by Sami aka Guilty Pleasures. I am the sole writer on this site.
Every tutorial written on this site is done completely from my imagination and creativity.
Any resemblance to another Tutorial is purely coincidental.
If you would like to share your results please send Email Me .
*Note- Any email address on older tutorials I do not have access to.. Please send all results to guiltypleasurestt@yahoo.com. There is to many tutorials to change the email address on them all.. Thank you *
Skater Babe
Scrapkit Garvs Sk8tr by Missy @ Scraps with Attitude
Tube by Keith Garvey purchase his work and license to use @ MPT
Mask 238 by Weescotslass

This tutorial was written by Samantha on 30 September 2009.
Any similarities to this is completely coincidental.
Create new raster layer 600x600
open film strip frame3 copy and paste as new layer
resizing by 60 %
Move to the bottom and duplicare
open tube of choice
copy and paste as new layer
Move duplicated frame above tube layer
and erase the part that covers your tube
open paper 19 copy and paste as new layer
Go to layers, load/save mask
I am using mask 238 by Wees
open up buttom bow 3
copy and paste as new layer
reszing by 50 % then again by 80 %
Move to the bottom of your frame
in the center..
open your skateboard of choice
I am using board1
copy and paste as new layer
resize by 40%
Free rotate right by 49.91%
duplicate and mirror
open butterfly of choice
Copy and paste as new layer
resizing by 20%
Place on your board.
Duplicate and place at the bottom of your frame
Add your name Copyright and your done.
Send your results to scrapsbysamantha@gmail.com
Tuesday, September 29, 2009
Lilac Kisses PTU
Scrap kit by JTs Designs Lilac Kisses
Art work of Elias Chatzoudis purchase his work and license to use @ MPT
Mask284 By Weescotslasscreations

Create new raster layer 600x600
Open frame 6 Copy and paste as new layer
resize my 80%
open paper of choice
copy and paste as new layer moving
below your frame layer.
Go to Layers, Load and save mask
I am using WSL238
Merge mask group
Open tube of choice.
Copy and paste as new layer
Move to the right below your frame
Grab your magic wand and click inside
the frame Go to selections modify and
and expand by 3
Invery
and hightlight your tube and hit delete.
add a luminace to your tube
Copy and paste tube once agian and mirror
Copy and paste butterfly of choice
Resize by 61 %
add your copyright, name and you are done.
Please send your results to Samantha
Saturday, September 26, 2009
Spookyville Tut
Tube by Ismael Rac
mask by Weescotslass Creations

This tutorial was written by me any similarities to this is completely coincidental.
Lets begin
Create new raster layer 600x600
open paper of choice. i am using paper 11
Copy and paste as new layer
go to layers
Load/Save mask of choice.
I am using WSL-mask 94
open tube of choice
Copy and paste as new layer
Resize tube layer by 80%
Open your spooky word art
Copy and paste as new layer
Move to the bottom of your tube
Duplicate tube and grab your eraser tool
Erase the parts of the legs that
are over the word art
Open up your haunted house
Copy and paste as new layer
Move above your mask layer
You will see the ghosts on the side
of your tube
Open your pumpkin. I am using Pumpkin 1
Copy and paste as new layer
resize by 50%
Place to the bottom right
See mine for placement
Open both brooms
copy and paste broom 1
resize by 60%
Free Rotate right by 15%
Move below your pumpkin
Copy and past broom 2
resize by 60%
Free Rotate left by 15%
move below your pumpkin
Add your copy right name and save
Your done.. Send me your results
Please send your results to Samantha
Thursday, September 24, 2009
Hottie in the City
Scrap by Tiny D you can purchase @ scrappinbytiny
Tube by Keith Garvey you can purchase his work and license to use @ MPT
Mask by Weescotslasscreations

Tube by Keith Garvey you can purchase his work and license to use @ MPT
Mask by Weescotslasscreations

This tutorial was written by me on 24 September 2009
All similarities are completely coincidental.
Create new raster layer 600x600
open your tube Copy and paste as new layer
Open your City block
Copy and paste as new layer
resize it by 50%
Move below your tube layer
hightlight your tube layer
mirror your tube layer
Open a paper of choice.
I am using paper 25
Copy and paste as new layer
Move below your city block
Go to layers load/save mask
Use Make of choice
I am using WSL_Mask84
Merge Mask group
Open your cuffs
resize by 49% move to the bottom of your city block
below your tube
Open your lipstick
copy and paste as new layer
resizing by 50%
Move right above your city block below your cuff layer
open your cellphone of choice.
I am using the pink one
Copy and paste as new layer
resizing by 40%
free rotate by 10.70 to the left
Move to the left of your city block below your
tube layer
You can add what ever elements
or words you want
I have added Hottie in the City
Added a Gradient white glow to that
with an over lay
add your name, copy right and save
your done.
Please send your results to ScrapsbySamantha@gmail.com
I would love to see them..
thank you for trying my tut
Tuesday, September 22, 2009
Rockin 'Round the Clock
Scap Kit Rockin Round the Clock @ Envied & Admired Scraps
Mask of choice, I am using mask 97 By Weescotslasscreations
NO OUTSIDE TUBES USED FOR THIS TUT

This Tutorial was written on 22 September 2009 By Samantha.
All similarities to this is completely coincidental.
Create new raster layer 600x600
open frame of choice
I am using frame 2
Copy and paste as new layer
resizing by 80%
Open a girl and boy of choice
Copy and paste the girl
resize to your liking and move below your frame
Do the same to the boy..
Grab your eraser tool and erase the parts of
the tubes that are showing oout of the frame
open papers of choice
I am using paper 7 and paper 2
Load layer mask
I am using WSL Mask 97
Paper 2 resize up by 115 % and move
below the 1st paper
Open your record
copy and paste as new layer
resize by 20%
Open your jukebox
copy and paste as new layer
resizing by 30%
Move to the bottom left
Move your record to the top
behind ur jukebox
Duplicate record and move down slightly
Open Music notes2 Copy and paste as new layer
resize by 30%
duplicate 2 time and move around
open Clock 2 copy and paste as new layer
Resize by 20%
Move to the top of your image
Add your name and copyright
Save and your done.
I wanted to keep it pretty simple..
Friday, September 18, 2009
Witches Brew
New Halloween tut using a FTU kit.
Just a lil Spook FTU kit by ScrapsbyDMG
Tube of choice. I am using Ismael Rac. You can purchase his work here
Mask of choice. I am using Mask 43 by Weescotslass Creations
this tutorial was written 17 September 2009, by me. Any similarities is completely coincidental.

Create new Raster Layer 600x600
Open frame 3 copy and paste as new layer
resize by 80%
Open tube of choice. I am using the work of
Ismael Rac
Copy and paste tube as a new layer
Move below your frame layer
Grab your magic wand
Click inside the frame, go to selections
Invert and highlight your tube layer and delete.
Open your paper of choice
I am using paper 16
Copy and paste as new layer
move below your tube layer
Go to layers, load/save mask of choice
I am using WSL43
Merge group
Copy and paste your tube once agian
Resize by 90%
mirror and move to the left..
highlight your tube that is in the frame
Add the lighten effect on her and take your
transparency to 94%
open spiderweb 1
copy and paste as new layer
Move above your mask layer
Open spider 2
Copy and paste as new layer
resizing by 30% Move to the top right of your frame
duplicate and Mirror
Open your cauldron
Copy and paste as new layer
resizing by 30%
Move to the bottom right of your frame
open your cat, copy and paste as new layer
resizing by 30%
Move below tube layer 2.
duplicate and mirror.
The second cat should be near your cauldron
Move it below your Cauldron
Add word art of choice
Name and copy right
Save and your complete.
Please send me your results I would love to see them
scrapsbysamantha@gmail.com
Thursday, September 10, 2009
I Got an Award

make sure to follow the award guidelines:
1.display the award on ur blog
2.Link to the blog u recieved it from
3.Nominate 10 other blogs
4.Leave a message for them on their blog
these r the blog I awarded:
Wednesday, September 9, 2009
Beach Fun
Scrap Kit Beach fun by ZiggyFan
Mask 85 by Weescotslass Creations
Tube of Choice I am using Pinup Toon, please do not use unless you have a proper license to do so. you can purchase his work and a license @ CILM

This tutorial was written by me on 9 September 2009. Any similarities to this is completely coincidental.
Open new raster layer 600x600n
Open tube of choice
copy and paste as new layer
open paper of choice I am using paper 6
Copy and paste as new layer
Go to layers, load and save mask
Merge mask group
Move below your tube
Open both of your surf boards.
Grab one copy and paste as new layer
Move below your tube layer
Free rotate right by 15
copy and paste your second surf board
Move below your tube
Free rotate right by 15
mirror image
Open your sand castle
Copy and paste as new layer
resize to your liking and move below your tube layer
bottom left for placement
Open your sand pale
copy and paste as new layer
resize to your liking
Move to the bottom right
Open your umbrella
Mirror image
resize to your liking and move behind your pail
Open your life ring
copy and paste as new layer
Resize by 50%
Free rotate by 50
Move below both surfboards and behind your tube
add your copy right, name and save
you are complete.
Dont forget to send me your results to scrapsbysamantha@gmail.com
Saturday, September 5, 2009
Happy Halloween
Scrap Kit Halloween by Sarah. You can puchase @ Pimp My tags with Scraps
Tube by Keith Karvery, You can purchase his work @ MPT. Do not use unless you have a proper license to do so.
Maske 362 by Vix, you can download here
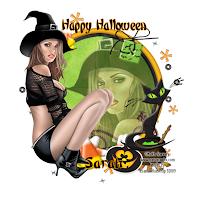
Lets get started. This tutorial was written by me on 2September 2009. All similarities to this is completely coincidental..
You will need pspx2 or any earlier version
Create new raster layer 600x600 Flood fill white,
Open your frame of choice. I am using Frame2
Copy and paste as new layer
Grab your magic wand and click inside the frame
Make sure you get all the little circles too
Then go to selections, modify and expand by 6
open your tube of choice. Copy and paste as new layer
I am using the close up layer for this tube.
Go to selections, invert and delete
Now go to your regular tube layer
copy and paste as a new layer
Go to image and mirror, move to the left of the frame
Open a paper of choice. I am using pp7
Copy and paste as new layer
Move below your frame layer
Highlighting your frame layer
Grab your magic wand and click inside the frame
Make sure you get all the little circles too
Then go to selections, modify and expand by 6
highlight your paper layer, go to selections
invert and hit delete.
Now open your spilled beads 1 element
copy and paste new layer
Move below your paper layer resizing by 80%
Open your couldron, copy and paste as new layer
Move above your tube layer and resize by 50%
Move to the bottom right of your frame
open up the cat of choice. I am using cat1
Copy and paste as new layer
resize by 50% and move to where it is sitting on the couldron
Open up the pumpkin sticker of choice
I am using sticker3. Copy and paste as new layer
Resizing by 50%, pace near the bottom of your couldron
Open up your candy corn copy and paste as new layer
resizing by 50% Move to the bottom, place under your tube layer
duplicate and free rotate right by 35%
Duplicate again and free rotate left by 50%
Merge down and duplicate move the duplicated layer
over behind your couldron
Duplicate again, move up to the top of the frame
resize by 70%, move below the hat of your tube
open up a button of choice.
I am using button2, copy and paste as new layer
Resize by 50% move to the top of your frame layer
see mine for placement
Add words of choice
I added Happy Halloween
and used a gradient glow with this color f7a009
Add your copyright, name and save
You are complete..
Friday, September 4, 2009
Sugary Sweet
Scrap kit by Tiny you can purchase it @ Tiny D's Tiny D's Scrappin Designs
Art work of Elias Chatzoudis you can purchase it @ MPT
Mask 364 by VIX

Create new raster layer 600x600
Open your tube copy and paste as new raster layer
Flood Fill White
Go to your magic wand too and go to selections
We are going to create a frame.
Create a new raster layer
You want the shape set to rounded Rectangle
Make a small rounded rectangle
Go to Selections, Modify border and outside by 5
Flood fill the frame border with a color from your tube
Duplicate and move down, Merge both together \
Copy and paste your tubemove below your frame layer
selecting your magic wand again
Click inside both frames and go to selections,
modify and expand by 5 then highlighting your tube layer
Go to selections and invert, hit the delete key
Now open up a paper of choice I am using pp19
Copy and paste as new layer, moving above your
white Background layer
Open mask of choice i am using mask 364 by Vix
Merge mask group
Now open your tube once again
Copy and paste as new layer
Mirror your tube
Here is where we have fun with it
Open your sucker elements
I am using 3, Lolli7,8, and 10
Copy and paste lolli 10 as new layer
resizing by 20% Moving slightly below your tube image
Copy and paste lolli8 as a new layer
resizing by 20%. free rototae right by 20
Copy and paste lolli7 as new layer
resizing by 20% free rotate left by 20
Open 2 candy sticks of choice
Copy and paste as new layer
resizing by 30% free rotate right by 20%
copy and paste as new layer resizing by 30%
free rotate left by 20
moving both to the right below her feet
open up an icecream cone of choice
copy and paste as new layer
resizing to your liking and place in the center
of your suckers below her legs
Open up your sparkles
copy and paste as new layer
resize by 50% and free rotate right by 90
Move below your all other layers right above your frame layer
Duplicate and mirror moving the duplicated layer right above your mask layer
Grab your eraser and erase the part of the duplicated layer of sparkles that covers your 1st tube layer
add words if you choose or leave it alone
Add your copyright, name and save
I would love to see your results :) So send them to
Scrapsbysamantha@gmail.com
Thursday, September 3, 2009
Pink Seduction
Scrap Kit pretty in pink by Ali. You can puchase @ Paradise4Scrappers
Tube by Keith Karvery, You can purchase his work @ MPT. Do not use unless you have a proper license to do so.
Maske 362 by Vix, you can download it here. Please make sure you leave a little love when downloading.

Create new raster layer 600x600 Flood fill white,
Open your frame, i am using frame 1
copy and paste as new layer resizing by 50%
Open your tube, copy and paste as new layer
move below your frame
highlight your frame layer and grab your magic
wand clicking inside your frame
go to selections, modify and expand by 6%
highlight your tube layer
go to selections, invert and hid delete
move to the left and take your settings to luminance
Copy and paste your tube layer again
mirror your tube and move the the right.
Resize your tube by 90% (see mine for placement )
duplicate your frame layer and move above
the complete tube layer
highlight your tube layer, and grab your eraser tool
carefully erase the part of the tube that is below the frame
now hightlight your top frame layer and erase the part
of the frame that is covering your tube
Open the paper of choice I am using paper26
highlight your white back ground layer
copy and paste your paper
Go to layers, New masklayer, from image
find your mask in the box, make sure your
source luminance is checked hit okay..
Merge Mask Group
Now open up the butterfly of choice
I am using butterfly 1 copy and paste as new layer
resizing it by 20% move to the top left of your frame for placement
Open the flowers of your choice
I am using flower 3
copy and paste as new layer
free rotate left by 90% and resize by 30%
Move the the bottom of your frame
Add your copyright, name and save.
I would love to see your results please send them to
scrapsbysamantha@gmail.com
Wednesday, September 2, 2009
Whispers of the wind
New tutorial Whispers of the Wind.
I am using the beautiful ScrapKit by Ziggyfan - Something Special
Tube is by Jennifer Janesko Do not use unless you have the proper permissions to do so. You can obtain a licesnce to use her work here CILM

This tutorial was written by me on 2September2009. All similarities to this is completely coincidental.
Lets begin :)
You need pspx2 or any earlier version
Open New Raster Layer 600x600
Flood fill White
Open your frame, copy and paste as new layer
Open your tube and copy and paste as new layer
Move under your frame and resize your tube layer by 89%
Duplicate your frame layer and move above your tube layer
Grab your eraser tool and carefully erase the frame over
the hair and arm. Becareful not to erase to much of the frame
Now open up your paper of choice
I am using paper 3
Copy and paste as new layer moving just above your
white back ground layer
Highlighting your intact frame
Grab your magic wand and click inside the frame
Go to selections, Modify, and expand by 6%
Highlighting your paper. Go to selections, invert and hit delete
Open your bows. I am using the purplish one.
Copy and paste as new layer
Moving above all other layers
Resing by 50% free rotate left by 40%
Open your buttons. cut out one and copy and paste as new
layer. Resizing by 50% and free rotate left by 25%
and Move above your bow and to the center..
Grab a font of choice. I am using
Good vibrations
Type out " WHISPERS OF THE WIND IS EVERY DREAM OF THE SOUL."
add a gradient glow of choice
add your copyright, name and save
your done..
Send your results to scrapsbysamantha@gmail.com
Subscribe to:
Posts (Atom)
My Blinkie ☆
