About Me ☆

Hello, I am Sami, the Girl behind Guilty Pleasures. I have been
writing tutorials since May 22, 2009. My first tutorial was called Twilight Obsession. How I got my name is simple. I found tagging to be my Guilty Pleasure. I thought it fit perfectly. I am a designer as well. You can find links to my blogs on my top menu. If you have questions please feel free to ask. Other wise you can read more about me on my
ABOUT ME PAGE!
My Blogs☆

Store Manager ☆
CT Manager☆




Favorite Blogs ☆







My Hangouts☆

Showing posts with label Ziggyfan. Show all posts
Showing posts with label Ziggyfan. Show all posts
Saturday, October 10, 2009
Simply Sexy
Scrap Kit I Love Chrome By Ziggyfan.
It is a free to use kit. You can download here.
If you download be sure to leave her lots of love
Artwork of Ismael Rac, you can purchase his work and a
license to use @ AMI .

and flood fill white
grab your rectangle tool and create a rectangle
go to selections, modify and add border
Outside border by 10
Flood Fill your border on your frame with color of choice.
I am using black
Grab your tube copy and paste as new layer
Move above your tube layer and erase the
part of her legs that are below the frame
open paper of choice.
I am using paper 2
Copy and paste as new layer
Move below your frame layer
Go to selections expand by 3
making sure your paper layer is highlighted
Selections invert and hit delete
open your star
copy and paste as new layer
resize by 70%
move to the top right of your frame
Open your ipod
copy and paste ipod as new layer
resize by 50%
Move to the bottom left
Copy and paste headphones as new layer
resize by 50%
place near your star top right
open your shorts
copy and paste as new layer
resize by 60%
Place bottom right
Open your shirt
copy and paste as new layer
resize by 60%
move blow your shorts
Add your name, copyright and save.
You are done.
Send your results to simplysami2011@gmail.com
Wednesday, September 9, 2009
Beach Fun
Scrap Kit Beach fun by ZiggyFan
Mask 85 by Weescotslass Creations
Tube of Choice I am using Pinup Toon, please do not use unless you have a proper license to do so. you can purchase his work and a license @ CILM

This tutorial was written by me on 9 September 2009. Any similarities to this is completely coincidental.
Open new raster layer 600x600n
Open tube of choice
copy and paste as new layer
open paper of choice I am using paper 6
Copy and paste as new layer
Go to layers, load and save mask
Merge mask group
Move below your tube
Open both of your surf boards.
Grab one copy and paste as new layer
Move below your tube layer
Free rotate right by 15
copy and paste your second surf board
Move below your tube
Free rotate right by 15
mirror image
Open your sand castle
Copy and paste as new layer
resize to your liking and move below your tube layer
bottom left for placement
Open your sand pale
copy and paste as new layer
resize to your liking
Move to the bottom right
Open your umbrella
Mirror image
resize to your liking and move behind your pail
Open your life ring
copy and paste as new layer
Resize by 50%
Free rotate by 50
Move below both surfboards and behind your tube
add your copy right, name and save
you are complete.
Dont forget to send me your results to scrapsbysamantha@gmail.com
Mask 85 by Weescotslass Creations
Tube of Choice I am using Pinup Toon, please do not use unless you have a proper license to do so. you can purchase his work and a license @ CILM

This tutorial was written by me on 9 September 2009. Any similarities to this is completely coincidental.
Open new raster layer 600x600n
Open tube of choice
copy and paste as new layer
open paper of choice I am using paper 6
Copy and paste as new layer
Go to layers, load and save mask
Merge mask group
Move below your tube
Open both of your surf boards.
Grab one copy and paste as new layer
Move below your tube layer
Free rotate right by 15
copy and paste your second surf board
Move below your tube
Free rotate right by 15
mirror image
Open your sand castle
Copy and paste as new layer
resize to your liking and move below your tube layer
bottom left for placement
Open your sand pale
copy and paste as new layer
resize to your liking
Move to the bottom right
Open your umbrella
Mirror image
resize to your liking and move behind your pail
Open your life ring
copy and paste as new layer
Resize by 50%
Free rotate by 50
Move below both surfboards and behind your tube
add your copy right, name and save
you are complete.
Dont forget to send me your results to scrapsbysamantha@gmail.com
Wednesday, September 2, 2009
Whispers of the wind
New tutorial Whispers of the Wind.
I am using the beautiful ScrapKit by Ziggyfan - Something Special
Tube is by Jennifer Janesko Do not use unless you have the proper permissions to do so. You can obtain a licesnce to use her work here CILM
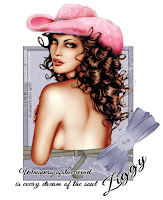
This tutorial was written by me on 2September2009. All similarities to this is completely coincidental.
Lets begin :)
You need pspx2 or any earlier version
Open New Raster Layer 600x600
Flood fill White
Open your frame, copy and paste as new layer
Open your tube and copy and paste as new layer
Move under your frame and resize your tube layer by 89%
Duplicate your frame layer and move above your tube layer
Grab your eraser tool and carefully erase the frame over
the hair and arm. Becareful not to erase to much of the frame
Now open up your paper of choice
I am using paper 3
Copy and paste as new layer moving just above your
white back ground layer
Highlighting your intact frame
Grab your magic wand and click inside the frame
Go to selections, Modify, and expand by 6%
Highlighting your paper. Go to selections, invert and hit delete
Open your bows. I am using the purplish one.
Copy and paste as new layer
Moving above all other layers
Resing by 50% free rotate left by 40%
Open your buttons. cut out one and copy and paste as new
layer. Resizing by 50% and free rotate left by 25%
and Move above your bow and to the center..
Grab a font of choice. I am using
Good vibrations
Type out " WHISPERS OF THE WIND IS EVERY DREAM OF THE SOUL."
add a gradient glow of choice
add your copyright, name and save
your done..
Send your results to scrapsbysamantha@gmail.com
I am using the beautiful ScrapKit by Ziggyfan - Something Special
Tube is by Jennifer Janesko Do not use unless you have the proper permissions to do so. You can obtain a licesnce to use her work here CILM

This tutorial was written by me on 2September2009. All similarities to this is completely coincidental.
Lets begin :)
You need pspx2 or any earlier version
Open New Raster Layer 600x600
Flood fill White
Open your frame, copy and paste as new layer
Open your tube and copy and paste as new layer
Move under your frame and resize your tube layer by 89%
Duplicate your frame layer and move above your tube layer
Grab your eraser tool and carefully erase the frame over
the hair and arm. Becareful not to erase to much of the frame
Now open up your paper of choice
I am using paper 3
Copy and paste as new layer moving just above your
white back ground layer
Highlighting your intact frame
Grab your magic wand and click inside the frame
Go to selections, Modify, and expand by 6%
Highlighting your paper. Go to selections, invert and hit delete
Open your bows. I am using the purplish one.
Copy and paste as new layer
Moving above all other layers
Resing by 50% free rotate left by 40%
Open your buttons. cut out one and copy and paste as new
layer. Resizing by 50% and free rotate left by 25%
and Move above your bow and to the center..
Grab a font of choice. I am using
Good vibrations
Type out " WHISPERS OF THE WIND IS EVERY DREAM OF THE SOUL."
add a gradient glow of choice
add your copyright, name and save
your done..
Send your results to scrapsbysamantha@gmail.com
Sunday, August 30, 2009
Sweet N Sassy
Scrap Kit is by Ziggy, you can find the kit here
Tubes are the art work of Keith Garvery. Do not use without a proper license. You can purchase his tubes and a license here
Mask 81 is by Weescotslass Creations.

This tut was written on 30 August 2009. This is an original tutorial by Samantha.
All others completely a coincidence.
LETS BEGIN
PSP X2
Create new raster layer 600x600
Flood fill white
Open your frame
copy and paste as new layer
Open up tube of choice
Copy and paste as new layer
move below your frame
I have her behind the left frame
grab your magic wand
Click inside the left frame ( you need to see marching ants)
Selections Modify expand by 10
Invert, highlight your tube layer and hit delete
Open up tube of choice
Copy and paste as new layer
move below your frame
I have her behind the right frame
grab your magic wand
Click inside the right frame ( you need to see marching ants)
Selections Modify expand by 10
Invert, highlight your tube layer and hit delete
Make both the tubes on the left and right
Luminance Legacy
Now open up a third tube
copy and paste as new layer
Move it above your frame layer
Highlight your white background layer
Now open up the paper of choice
I am using paper 1
Copy and paste as new layer
Go to layer, Load/save mask invert transparency unchecked
I am using Mask 81 by Weescotslass Designs
Now open another paper of choice.
I am using paper 4
Copy and paste as new layer
Make sure it is above your mask layer
highlight your frame layer and grab your magic wand
Click inside the left frame holding your shift down
click inside the right frame
Go to selections Modify and expand by 10
highlight paper 4
go to selections invert and delete
Open up element of choice
I am using the Flower
Copy and paste as new layer
Move t the very top
resize by 50%
Move below your final tube layer
Duplicate and mirror
Move down to the bottom of your frame
See mine for placement of both
Open up your beads
copy and paste as new layer
Move to the bottom of your frame
resize to your liking and move below your last tube layer
Add your copyright, name and save
You are done.
Don't forget to share your results.
Send to scrapsbysamantha@gmail.com
Tubes are the art work of Keith Garvery. Do not use without a proper license. You can purchase his tubes and a license here
Mask 81 is by Weescotslass Creations.

This tut was written on 30 August 2009. This is an original tutorial by Samantha.
All others completely a coincidence.
LETS BEGIN
PSP X2
Create new raster layer 600x600
Flood fill white
Open your frame
copy and paste as new layer
Open up tube of choice
Copy and paste as new layer
move below your frame
I have her behind the left frame
grab your magic wand
Click inside the left frame ( you need to see marching ants)
Selections Modify expand by 10
Invert, highlight your tube layer and hit delete
Open up tube of choice
Copy and paste as new layer
move below your frame
I have her behind the right frame
grab your magic wand
Click inside the right frame ( you need to see marching ants)
Selections Modify expand by 10
Invert, highlight your tube layer and hit delete
Make both the tubes on the left and right
Luminance Legacy
Now open up a third tube
copy and paste as new layer
Move it above your frame layer
Highlight your white background layer
Now open up the paper of choice
I am using paper 1
Copy and paste as new layer
Go to layer, Load/save mask invert transparency unchecked
I am using Mask 81 by Weescotslass Designs
Now open another paper of choice.
I am using paper 4
Copy and paste as new layer
Make sure it is above your mask layer
highlight your frame layer and grab your magic wand
Click inside the left frame holding your shift down
click inside the right frame
Go to selections Modify and expand by 10
highlight paper 4
go to selections invert and delete
Open up element of choice
I am using the Flower
Copy and paste as new layer
Move t the very top
resize by 50%
Move below your final tube layer
Duplicate and mirror
Move down to the bottom of your frame
See mine for placement of both
Open up your beads
copy and paste as new layer
Move to the bottom of your frame
resize to your liking and move below your last tube layer
Add your copyright, name and save
You are done.
Don't forget to share your results.
Send to scrapsbysamantha@gmail.com
Subscribe to:
Posts (Atom)
My Blinkie ☆