About Me ☆

Hello, I am Sami, the Girl behind Guilty Pleasures. I have been
writing tutorials since May 22, 2009. My first tutorial was called Twilight Obsession. How I got my name is simple. I found tagging to be my Guilty Pleasure. I thought it fit perfectly. I am a designer as well. You can find links to my blogs on my top menu. If you have questions please feel free to ask. Other wise you can read more about me on my
ABOUT ME PAGE!
My Blogs☆

Store Manager ☆
CT Manager☆







Favorite Blogs ☆







My Hangouts☆


Showing posts with label Ismael Rac. Show all posts
Showing posts with label Ismael Rac. Show all posts
Tuesday, September 18, 2012
Hocus Pocus

PTU Scrap kit - Hocus Pocus by Lizquis Scraps,
You can purchase her kits at Scraps and the City
Tube is Ismael Rac, do not use without a proper license to do so
Tube is Ismael Rac, do not use without a proper license to do so
You can purchase his tubes and a license at his store
New transparent raster layer 600x600
Open frame 3 copy and paste as new layer
Resize down 2 times by 80% and free rotate to the left by 90%
It should now be Vertical
Open paper2 copy and paste as new layer
Move below the frame layer
erase all parts on the outside of the frame
Open your tube copy and paste as new layer
Move below the frame layer and place as desired
Erase all parts on the outside of the frame
add a Xero Porcelin with the following settings
and mirror
open the tree copy and paste as new layer
Resize down 1 time by 80% and place to the bottom left
Place above all other layers
Open your tube again
copy and paste as new layer
Resize down about 5 times by 80%
Place to the center right above all other layers
open ribbon3 copy and paste as new layer
resize down about 3 times Move below the tube and tree
Move to the bottom
open ribbon1 copy and paste as new layer
resize down about 3 times move above the black ribbon
open sparkle 1 copy and paste as new layer
Move above the frame layer to the bottom
erase all parts on the outside of the frame
open the cauldrn copy and paste as new layer
resize down about 5 times by 80% and move above the tree
placed in the center and to the left of the tube layer
but below the tube
Open the cat copy and paste as new layer
Resize down about 4 times by 80% and move to the right above
the tube layer
open the shoes copy and paste as new layer
resize down by 80% about 4 times move above all other
layers and to the left of the cauldron
open the web copy and paste as new layer
move below the frame layer and erase all parts on the outside
of the frame
Add your name copyright and save

Wednesday, June 20, 2012
Beautiful Emo

PTU Scrap Kit is Emo Girl - Amy Marie
You can purchase here
Artwork is from Isamel Rac , you can purchase here
New Raster Layer 600x600
open frame 2 copy and paste as new layer
Resize down by 90% 1 time
place in the center
Open your close up tube and paste as new layer
Move below the frame layer
Grab the eraser and erase all parts on the outside of the frame
Open paper 3 copy and paste as new layer
Resize down 2 times by 80%
Move below all other layers
Grab the eraser and erase all parts of the paper on the outside of the frame
Highlight the tube layer
Go to Effects, add a Xero - Porcelian with the following settings
Artwork is from Isamel Rac , you can purchase here
New Raster Layer 600x600
open frame 2 copy and paste as new layer
Resize down by 90% 1 time
place in the center
Open your close up tube and paste as new layer
Move below the frame layer
Grab the eraser and erase all parts on the outside of the frame
Open paper 3 copy and paste as new layer
Resize down 2 times by 80%
Move below all other layers
Grab the eraser and erase all parts of the paper on the outside of the frame
Highlight the tube layer
Go to Effects, add a Xero - Porcelian with the following settings

Duplicate the Tube layer
Highlight the original tube layer
Go to Adjust, blur, add a Gaussian Blur wit the following settings
Highlight the original tube layer
Go to Adjust, blur, add a Gaussian Blur wit the following settings

highlight the duplicated tube layer
Add an overly
Open your full body tube
copy and paste as new layer
Resize down by 90% about 4 times
Center Left
Highlight the frame layer
Duplicate the Frame and move above the tube layer
highlight the tube layer
grab the eraser and erase all parts on the outside of the tube
Open Wire copy and paste as new layer
Move to the top right,
Below all other layers
Open sparkles21 copy and paste as new layer
Move below the duplicated frame layer , to the bottom
Erase all parts on the outside of the frame layer
Open the emokitty copy and paste as new layer
Resize down by 90% about 5 times
Move to the bottom right
open star gem copy and paste as new layer
resize down 6 times by 80%
duplicate and move on each side
below the tube layer
open emocupcake copy and paste as new layer
Resize down by 80% about 6 times
move below the kitty and to the left of it
open the nail polish copy and paste as new layer
Resize down by 80% about 2 times
Move below the kitty to the right
open ribbon 1 copy and paste as new layer
Move below the cupcake layer
add your name copyright and save

Wednesday, May 30, 2012
Cute but Goth

Gothic Cute " PTU" kit by Amy Marie you can purchase here at Wendy G's Store
Tube is the art work of Ismael Rac. You can purchase at his store
Tube is the art work of Ismael Rac. You can purchase at his store
As always please do not use these tubes without a proper license and copyright!
New Raster Layer 650x650
open frame 2 copy and paste as new layer
place in the center
Resize down by 80% about 2 times
Open paper 23 copy and paste as new layer
Move below the frame layer
Erase all parts on the outside of the frame layer
Open GL1 copy and paste as new layer
Move below all other layers in the center
Open your tube layer copy and paste as new layer
Resize down by 80% about 3 times and move below the
frame layer to the right. Erase all parts on the outside of the frame
add a luminace legacy to your close up layer
Now grab your full length tube layer copy and paste as new layer
resize down 1 time by 80% and move to the left above all other layers
Open wire2 copy and paste as new layer
Move above the frame layer
To the bottom
Open sparklebrush1 copy and paste as new layer
Resize down by 80% about 2 time and move to the bottom
Grab the eraser and carefully erase all parts on the out side of the frame
Open ribbonAM3 copy and paste as new layer
Move below full length tube layer and to the left
open chalice1 copy and paste as new layer
Resize down by 80% about 3 times
Move to the bottom right
open the sadteddy copy and paste as new layer
resize down by 44% about 1 time
Move above all other layers and center bottom of the Full length tube layer
Open the skrv1 copy and paste as new layer
Resize down by 44% and then again by 80 % move to the center
between the tube and chalice
add your copyright, name and save
New Raster Layer 650x650
open frame 2 copy and paste as new layer
place in the center
Resize down by 80% about 2 times
Open paper 23 copy and paste as new layer
Move below the frame layer
Erase all parts on the outside of the frame layer
Open GL1 copy and paste as new layer
Move below all other layers in the center
Open your tube layer copy and paste as new layer
Resize down by 80% about 3 times and move below the
frame layer to the right. Erase all parts on the outside of the frame
add a luminace legacy to your close up layer
Now grab your full length tube layer copy and paste as new layer
resize down 1 time by 80% and move to the left above all other layers
Open wire2 copy and paste as new layer
Move above the frame layer
To the bottom
Open sparklebrush1 copy and paste as new layer
Resize down by 80% about 2 time and move to the bottom
Grab the eraser and carefully erase all parts on the out side of the frame
Open ribbonAM3 copy and paste as new layer
Move below full length tube layer and to the left
open chalice1 copy and paste as new layer
Resize down by 80% about 3 times
Move to the bottom right
open the sadteddy copy and paste as new layer
resize down by 44% about 1 time
Move above all other layers and center bottom of the Full length tube layer
Open the skrv1 copy and paste as new layer
Resize down by 44% and then again by 80 % move to the center
between the tube and chalice
add your copyright, name and save

Saturday, May 26, 2012
Sexy Sweet

Artwork of Isamel Rac you may get it here
Sweet Treats PTU scrap kit by Amy Marie you may buy it here
Open the sweet treats template and Canvas Resize by 750x750
Open paper 42 copy and paste as new layer
copy and paste as new layer - Move above element 7 on the template
Highlight element 7 of the template and grab your magic wand
Click inside and once you have the march ants go to selections and invert.
highlight the paper layer and hit delete.
add a gradient glow
Open paper 43 copy and paste as new layer
copy and paste as new layer - Move above element 6 on the template
Highlight element 6 of the template and grab your magic wand
Click inside and once you have the march ants go to selections and invert.
highlight the paper layer and hit delete.
add a gradient glow
Open yuor close up tube copy and paste as new layer
Place above element 9
Highlight element 9 and grab your magic wand and click inside element 9
Once you have your marching ants go to selections and invert
highlight the tube layer and hit delete
Highlighting your tube layer go to Effects Xero, Porcelain with the following settings
Sweet Treats PTU scrap kit by Amy Marie you may buy it here
Open the sweet treats template and Canvas Resize by 750x750
Open paper 42 copy and paste as new layer
copy and paste as new layer - Move above element 7 on the template
Highlight element 7 of the template and grab your magic wand
Click inside and once you have the march ants go to selections and invert.
highlight the paper layer and hit delete.
add a gradient glow
Open paper 43 copy and paste as new layer
copy and paste as new layer - Move above element 6 on the template
Highlight element 6 of the template and grab your magic wand
Click inside and once you have the march ants go to selections and invert.
highlight the paper layer and hit delete.
add a gradient glow
Open yuor close up tube copy and paste as new layer
Place above element 9
Highlight element 9 and grab your magic wand and click inside element 9
Once you have your marching ants go to selections and invert
highlight the tube layer and hit delete
Highlighting your tube layer go to Effects Xero, Porcelain with the following settings

Duplicate the tube layer and highlight the original
Go to adjust , Gaussian blur with the following settings
Go to adjust , Gaussian blur with the following settings

highlight the duplicate tube layer go to Effects and add a black and white Film
Add overlay
Open your full length tube layer
copy and paste as new layer
Position above the Circles on the right and Duplicate...
position tube tube in desired areas
Highlight circle 11 grab the magic wand, click inside the circle
Once you see your marching ants go to selections, invert
Highlight the tube layer and hit delete..
Repeat for circle 12, and 15
Repeat the above steps for the left side
Open your full length tube layer copy and paste as new layer
Move above all other layers
Highlight Star 21 and go to adjust and add noise
With the following settings
Add overlay
Open your full length tube layer
copy and paste as new layer
Position above the Circles on the right and Duplicate...
position tube tube in desired areas
Highlight circle 11 grab the magic wand, click inside the circle
Once you see your marching ants go to selections, invert
Highlight the tube layer and hit delete..
Repeat for circle 12, and 15
Repeat the above steps for the left side
Open your full length tube layer copy and paste as new layer
Move above all other layers
Highlight Star 21 and go to adjust and add noise
With the following settings

add a Gradient glow
Open glittersplat4 copy and paste as new layer
Move below element 6
Open cupcake 2 copy and paste as new layer
Move above all other layers and to the left
Resize down by 80% about 2 times and move to the bottom left
behind the tube layer
Open emopup copy and paste as new layer
Resize down by 80% about 3 times
Move to the bottom right below the tube layer
I have it to where it looks like it is peeking around her arm
open curledrib copy and place as new layer
Move below the cupcake layer
Near the bottom
Duplicate the ribbon and mirror
Move the duplicated ribbon below the pup
near the top
Open glass 1 copy and paste as new layer
Resize down by 80% about 3 time
Move below the cupcake layer and above the ribbon
near the bottom
Add your copyright, name and Save
**THIS TUTORIAL WAS WRITTEN ON 5.26.12 BY SAMI AKA GUILTY PLEASURES BY MY OWN CREATIVITY AND IMAGINATION ANY SIMILARITIES IS COMPLETELY COINCIDENTAL!**
Open glittersplat4 copy and paste as new layer
Move below element 6
Open cupcake 2 copy and paste as new layer
Move above all other layers and to the left
Resize down by 80% about 2 times and move to the bottom left
behind the tube layer
Open emopup copy and paste as new layer
Resize down by 80% about 3 times
Move to the bottom right below the tube layer
I have it to where it looks like it is peeking around her arm
open curledrib copy and place as new layer
Move below the cupcake layer
Near the bottom
Duplicate the ribbon and mirror
Move the duplicated ribbon below the pup
near the top
Open glass 1 copy and paste as new layer
Resize down by 80% about 3 time
Move below the cupcake layer and above the ribbon
near the bottom
Add your copyright, name and Save
**THIS TUTORIAL WAS WRITTEN ON 5.26.12 BY SAMI AKA GUILTY PLEASURES BY MY OWN CREATIVITY AND IMAGINATION ANY SIMILARITIES IS COMPLETELY COINCIDENTAL!**
Wednesday, January 4, 2012
Happy New Year

This tutorial was written on 4January2012 by Sami, using my own imagination and ctreativity
any similarities is completely coincidental.
Scrap kit is

Monday, November 7, 2011
Beautiful Angel - PTU

own creativity and imagination. Any similarities is completely unintentional and coincidental.
******************************
Tube is by Ismael Rac. You can purchase at his store HERE.
Please do not use his work with out a proper license.
Scrapkit is a PTU kit by Angel's Designz
You can purchase this at The Creativity Box
New Raster Layer 700x700
Open Film strip copy and paste as new layer
Resize down by 80% Move near the bottom
Open Paper 12 copy and paste as new layer
Move below all other layers
Grab your selection tool
Make a rectangle that is the length of the frame
Go to selection invert, Highlight your paper layer and hit Delete
Open your Tube Move below all other layers
Copy and paste as new layer
Place different parts of her in the filmstrip
Grab your selection tool
Make a rectangle that is the length of the frame
Go to selection invert, Highlight your tube layer and hit Delete
Do this for every Tube layer you have that is going inside the frame
Merge all tube layers and add a luminance Legacy
Copy and paste your tube again
Place it to where her legs are on the bottom of the filmstrip This time place her in the center
Open your feather fan copy and paste as new layer
Move below the tube layer
Place on top of the film strip in the center
open your messy scatter copy and paste as new layer
Move below all other layers
Move up to where it is above the fan just alittle
Open your doodle copy and paste as new layer
resize down to your liking Move below the fan layer
Duplicate and flip
Open Sparkle 3 copy and paste as new layer
Move above your doodle layer
Add your name, Copyright Save and your done



Monday, August 8, 2011
Summer Love - FTU

This tutorial was written on August 8, 2011 by Guilty Pleasures aka Sami.
This was done using my own imagination and creativity any similarities is completely coincidental
************
FTU Kit Summer Breeze by Stef's Scrapkits
Tube by Ismael Rac
Mask 350 by Vix PSP
**************
New raster layer 750x750 We will resize later if neded
Open paper 1 copy and paste as new layer
Go to layer, new mask layer from image.
Choose image from the drop down and hit OK
Merge group. Resize up by as desired.
Open Tube Copy and paste as new layer Reszie down by 80%
Open Element 23
copy and paste as new layer
Move below tube layer to the right
Open Element 9 Copy and paste as new layer
resize by 80% Move below the tube layers
Move to the right so it looks like she is sitting on it.
Open Element 12
copy and paste as new layer
Resize to Desired Size
Move Just above element 23
open element 33
copy and paste as new layer
Resize to desired Size
Move Above element 9
Open Element 29 copy ans paste as new layer
Resize to desired size
move below the tube layer
Open Element 8 Copy and paste as new layer
Resize to desired size and pace as you see fit
Open Element 30 Copy and paste as new layer
Resize to desired size and pace as you see fit
Add your Copyright, name save and you are done
Open paper 1 copy and paste as new layer
Go to layer, new mask layer from image.
Choose image from the drop down and hit OK
Merge group. Resize up by as desired.
Open Tube Copy and paste as new layer Reszie down by 80%
Open Element 23
copy and paste as new layer
Move below tube layer to the right
Open Element 9 Copy and paste as new layer
resize by 80% Move below the tube layers
Move to the right so it looks like she is sitting on it.
Open Element 12
copy and paste as new layer
Resize to Desired Size
Move Just above element 23
open element 33
copy and paste as new layer
Resize to desired Size
Move Above element 9
Open Element 29 copy ans paste as new layer
Resize to desired size
move below the tube layer
Open Element 8 Copy and paste as new layer
Resize to desired size and pace as you see fit
Open Element 30 Copy and paste as new layer
Resize to desired size and pace as you see fit
Add your Copyright, name save and you are done
Saturday, February 12, 2011
Sweet Dreams

Tutorial Written on 12 February 2011, By Sami aka Guilty Pleasures
Any similarities to this is completely coincidental..
Scrap Kit Sweet Dreams by Honored Scraps.
Tube by Ismael Rac. You must have a license to use his work.
Mask 23 by Becky . I am sorry I do not remember where i downloaded
this from. If it is your or you know the link please let me know.
I will gladly link it for you.
NEw raster layer 600x600
Open frame 4
copy and paste as new layer
resize down by 50%
Open tube copy and paste as new layer (Close up layer)
Move below frame
earase the top that sticks above frame
open paper 7 copy and paste as new layer
Move below all other layers
GO to layer
new mask layer from image
find the image in the drop down
Make sure your paper layer is highlighted
Click okay. When finished Merge group
Resize up by 113%
open heartribbon with charm and copy and paste as new layer
Resize by 70%
Move to the top right
Add a drop shadow to the frame..
Open Full tube
copy and paste as new layer
Open butterfly 4
copy and paste as new layer
Resize down by 50 and then again by 70%
Place on the top of the ribbon
Open Flower 6 and Flower 4
Copy and paste 6
resize down by 50
Move to the bottom left
And below your tube layer
Do the same to Flower 4
Arrange them to where it looks like she
is sitting on the flowers
open fairydust 2
copy and paste as new layer
move above the merged group layer
open glittertrail 2 copy and paste as new layer
Move above your frame layer
Placing accordingly
Grab your text tool and find a color from the kit
I used #86195e Type out Sweet Dreams
Font of Choice I used Juilet.
I do not remember where I found this at..
Do the same for the name. I used the same color and font
add a gradient glow to both
Add copyright and name,
save and your done.
Tuesday, November 9, 2010
Rac Addict - PTU

New Tutorial Featuring Rac Addict By Crystals Creations.
You can purchase this Kit and others at Scrappin Warehouse
Scrap Kit Rac Addict by Crystals Creations
tubes by Ismael Rac purchase them ans a lisence to use ay his Store Xeracx Store
Template is 196 by Ali You can get it at Designs By Ali
Open Template Hold shift+d To duplicate
Close the origional
Canvas Resize by 800x800
We will crop out the unwanted
Open your tubes..
I have chosen 3 From Rac
2 close ups and 1 full body pose
now open 3 papers
I have chosen 11 9 and 6
Copy and paste paper 9 as new layer into the template
drag down between raster layer 9 and 4.
Grab your magic wand and click inside of the circle on rster layer 4
go to selections Modify invery and highlight the paper layer and hit delete.
Copy and paste paper 6
Move between raster 7 and 3
Grab your magic wand and click inside of the retangle on raster layer 7
go to selections Modify invery and highlight the paper layer and hit delete.
do the same for the oposite side.
Grab your close up tubes adn repeat the same steps as with the paper
But using your close up layer tubes..
grab the close up of ur full length tube
Copy and paste as new layer
She is going in the center of the big circle..
add a lumanice legacy to all the tubes
and take the transparency down on the center one.
I colorized the frames of the template,
you can leave them the way they are or use papers
Grab your full body tube Copy and paste as new layer
Put her in the center..
Duplicate and move above all other layer
Move the other below raster layers 5 and 6
Grab your eraser and highlight the duplicate tube later
Carefully erase the part of her leg on the white..
So it looks like mine
Colorize raster layer 6 to match the rest
GRab your Rings, Black, Purple and Blue
Copy and paste as new layer
Moving below all other layers and move them around as needed
open your black fire copy and paste as new layer
Move above the intercircle tube
go to selections Modify invery and highlight the fire layer and hit delete
take the opacity down
Add other elements of choice
add your name copy right and save
Crop out any unwanted space and resize to the size of choice.
This tutorial was written by Samantha on 9 November 2010. Any Similarities to this is complete coincidental.
tubes by Ismael Rac purchase them ans a lisence to use ay his Store Xeracx Store
Template is 196 by Ali You can get it at Designs By Ali
Open Template Hold shift+d To duplicate
Close the origional
Canvas Resize by 800x800
We will crop out the unwanted
Open your tubes..
I have chosen 3 From Rac
2 close ups and 1 full body pose
now open 3 papers
I have chosen 11 9 and 6
Copy and paste paper 9 as new layer into the template
drag down between raster layer 9 and 4.
Grab your magic wand and click inside of the circle on rster layer 4
go to selections Modify invery and highlight the paper layer and hit delete.
Copy and paste paper 6
Move between raster 7 and 3
Grab your magic wand and click inside of the retangle on raster layer 7
go to selections Modify invery and highlight the paper layer and hit delete.
do the same for the oposite side.
Grab your close up tubes adn repeat the same steps as with the paper
But using your close up layer tubes..
grab the close up of ur full length tube
Copy and paste as new layer
She is going in the center of the big circle..
add a lumanice legacy to all the tubes
and take the transparency down on the center one.
I colorized the frames of the template,
you can leave them the way they are or use papers
Grab your full body tube Copy and paste as new layer
Put her in the center..
Duplicate and move above all other layer
Move the other below raster layers 5 and 6
Grab your eraser and highlight the duplicate tube later
Carefully erase the part of her leg on the white..
So it looks like mine
Colorize raster layer 6 to match the rest
GRab your Rings, Black, Purple and Blue
Copy and paste as new layer
Moving below all other layers and move them around as needed
open your black fire copy and paste as new layer
Move above the intercircle tube
go to selections Modify invery and highlight the fire layer and hit delete
take the opacity down
Add other elements of choice
add your name copy right and save
Crop out any unwanted space and resize to the size of choice.
Monday, September 20, 2010
Tanted Love

This tutorial was written on September 20, 2010 by Samantha
This is using my own creativity and imagination any resemblances is completely
coincidental
Tube by Ismael Rac
Create new Raster Layer
600x600
Open Roundframe 1
copy and paste as new layer
resize your frame down by 75%
Open your tube
copy and paste as new layer
drab below your frame layer
highlighting your frame layer
grab your magic wand and click inside the frame
go to selections, Modify and expand by 3.
Highlight your tube layer
Go to selections invert and hit delete..
Open paper of choice.
I am using Paper 11
Copy and paste as new layer
Move below all other layers
highlighting your frame layer
grab your magic wand and click inside the frame
go to selections, Modify and expand by 5.
Highlight your Paper layer Go to selections invert and hit delete..
Duplicate your frame
Open your tube again Copy and paste as new layer
Move below duplicate frame layer
With your tube layer highlighted
Grab your eraser and erase the part of the tube that
is below the frame
Highlight your duplicate frame layer
Erase the part of the frame that is covering the top of the tube
Open your Lightfantasy
copy and paste as new layer
Move below all other layers
Open the rose
Copy and paste as new layer
Resize by 60
Moving to the top
See mine for placement
Add your name
copyright and save
IT IS A SIMPLE BUT ELEGANT TAG
Monday, March 22, 2010
Touch of Night
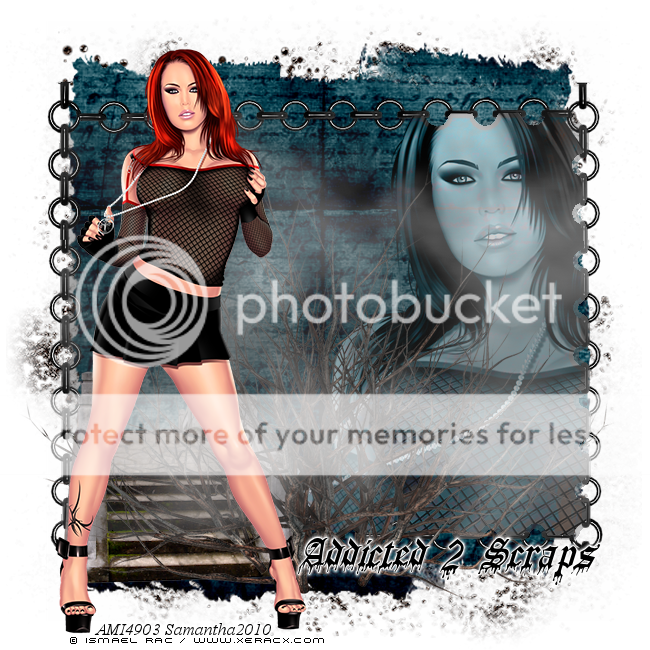
This tutorial is featuring a brand new
scrap kit by Addicted 2 Scraps. It is PTU Kit
Tube by Ismael Rac. Do not use his work unless
you have a license to do so.
Create new raster layer 650x650
You can flood fill white but I
am leaving it with a transparent background
Open Element12
copy and paste as new layer
open your tube close up layer
Copy and paste as new layer
Grab your magic wand
Highlight the Element 12 layer
And select inside of it
Go to Selection, modify and expland by 5
highlight your close up layer
Go to selections invert and hit delete
Add a Lumance Legacy to that
Open Element1 copy and paste as new layer
Move behind all other layer
Now open element49
copy and paste as new layer
Resize by 50% and then again by 80%
move to the left hand side of element12
See mine for exact placement
Open element45
copy and paste as new layer
Move to the bottom and duplicate
move the duplicate layer toward the top
Highlight element 12 layer
grab your magic wand and select
go to Selections modify and expand by 10
Highlight the element 45 layer
and hit delete
Do the same with the duplicate layer
open element 47
copy and paste as new layer
move above the bridge layer
Placing in the center
It will have that old foggy look to it
Open element 34
copy and paste as new layer
Move below all other layer
Resize up to your liking
open Your full body tube
copy and paste as new layer
Placing to the left above all other layers
Add your name Copyright and your done..
do not forget to save.. Wednesday, March 17, 2010
Dark Beauty
This Beautiful tutorial is featuring a
wonderful scrapkit by Jessica @ Gothic Inspirations
It is part of February' s DarkCravings Blog Train. You
can get this kit here
can get this kit here
Artwork is By Ismael Rac.
Please do not use if you dont have a license to do so.
You can purchase his work and a license @ AMI .
Font is TheNautiGirl

This tutorial was written on 17March2010 by Samantha
This is completely my imagination.. Any similarities to this is completely Coincidental.
Create new Raster layer 600x600
open frame 3 copy and paste as new layer
open your tube copy and paste as new layer
move below your frame
Grab your magic wand
highlight your frame layer
select inside the frame
Once you see the marching ants
Go to selections, modify and expand by 9
highlight your tube layer
Go to selections, invert and hit delete
open your tagback grid copy and paste as new layer
resize down by 90%
Move below your tube layer
open paper 14 copy and paste as new layer
Move just about your tagback layer
Grab your eraser and carefully erase the paper
On the outside of the frame.
go back to your tube layer and Add Luminace Legacy to it
Mirror your tube
open the cross with ribbon copy and paste as new later
Resize down by 80 %
Move to the top left of your frame
Open your tube once again
Copy and paste as new layer
Make sure it is above all other layers
Mirror and move to the right
open the bloodsplatter
copy and paste as new layer
Move just above your tag back layer
Duplicate 4 times and place in the
4 corners of the frame
Add your name and copyright.
dont forget to save. Your done..
open frame 3 copy and paste as new layer
open your tube copy and paste as new layer
move below your frame
Grab your magic wand
highlight your frame layer
select inside the frame
Once you see the marching ants
Go to selections, modify and expand by 9
highlight your tube layer
Go to selections, invert and hit delete
open your tagback grid copy and paste as new layer
resize down by 90%
Move below your tube layer
open paper 14 copy and paste as new layer
Move just about your tagback layer
Grab your eraser and carefully erase the paper
On the outside of the frame.
go back to your tube layer and Add Luminace Legacy to it
Mirror your tube
open the cross with ribbon copy and paste as new later
Resize down by 80 %
Move to the top left of your frame
Open your tube once again
Copy and paste as new layer
Make sure it is above all other layers
Mirror and move to the right
open the bloodsplatter
copy and paste as new layer
Move just above your tag back layer
Duplicate 4 times and place in the
4 corners of the frame
Add your name and copyright.
dont forget to save. Your done..
Wednesday, March 10, 2010
Shamrock Stalker

Ismael Rac happens to be one of my favorite
Tube artists. So I thought this was fitting.
This Tutorial was re written on March 10, 2010
BY Samantha. Any similarities to this is completely coinicdental.
Lets Begin
Scrap Kit is Stalkers St. Patricks Day
FTU Kit by Black Widows Creationz.
Tube by Ismael Rac. Remember to use his work.
You must first purchase it and a license to use at AMI.
Mask178 by Weescotslass Creations
Create new layer 600x600
Open frame 3
copy and paste as new layer
Make sure it is centered.
Open paper 5
copy and paste as new layer
Move below your frame layer
Open your mask
Go to layers
load mask from disk
merge mask group
open Mushrooms 1
copy and paste as new layer
place above your mask layer
Open tube of choice
copy and paste as new layer
Move above all other layers
move center right
Open potofgold1
copy and paste as new layer
move below your tube layer
Resize by 45%
Move bottom left
Open teddy1
copy and paste as new layer
resize 40%
Move infront of your pot of gold
Open hat 2
copy and paste as new layer
Resize by 60%
Mirror image
Move behind your pot of gold.
Add your name and copyright your done.
It did it this way so the copyright can be seen
Open frame 3
copy and paste as new layer
Make sure it is centered.
Open paper 5
copy and paste as new layer
Move below your frame layer
Open your mask
Go to layers
load mask from disk
merge mask group
open Mushrooms 1
copy and paste as new layer
place above your mask layer
Open tube of choice
copy and paste as new layer
Move above all other layers
move center right
Open potofgold1
copy and paste as new layer
move below your tube layer
Resize by 45%
Move bottom left
Open teddy1
copy and paste as new layer
resize 40%
Move infront of your pot of gold
Open hat 2
copy and paste as new layer
Resize by 60%
Mirror image
Move behind your pot of gold.
Add your name and copyright your done.
::NOTE::
The original tag does not have the white background.It did it this way so the copyright can be seen
Thursday, February 25, 2010
Irish Luck
A mini Tut featuring a great Irish Luck Kit by Addicted 2 Scraps
It is a FTU Kit. So if you download please Leave Lots of love
Tube used is Ismael Rac. You can purchase his work and a
license to use at AMI .
Mask178 by Weescotslass.

Create New raster layer 600x600
you can flood fill white, but I prefer transparent. Open paper 4
copy and paste as new layer
Open your mask as a new image
Go to layer, New Mask Layer, From Image
Open your mask of choice.
Merge Mask Group
open your tube
copy and paste as new layer
place in the center of your Merged Mask
open element 10 copy and paste as new layer
Move below your tube layer toward the bottom
Duplicate and mirror
open element 14
copy ans paste as new layer
move below your tube layer as well
Add Text of choice.
Copyright and your name
Save and your complete.
Saturday, February 6, 2010
Sweetest Valentine
Finally another tut for valentines day.
Scrap Kit by Vicki @ Pink Princess Scraps
Tube of Choice, I am using the art work of Ismael Rac - Do not use without a proper license to do so
Tube of Choice, I am using the art work of Ismael Rac - Do not use without a proper license to do so
you can purchase his work and proper use to use @ Artistic Minds
mask of choice - i am Vix_Mask363 by Vix. You can download here
mask of choice - i am Vix_Mask363 by Vix. You can download here

This tutorial was written on February 6, 2010 by Samantha
Any similarities to this is completely coincidental
Create new Raster layer 600x600 - rename background layer
open ele32 copy and paste as new layer
open your tube copy and paste as new layer
Move below your ele32
Erase the botom part of the tube carefully.
Highlight your background layer
and open a paper of choice
I am using pp2
copy and paste as new layer
go to layer and load and save mask
merge mask group
Add a drop shadow to your mask
open ele15
copy and paste as new layer
resize by 40%
move to the bottom right
open ele9
copy and paste as new layer
resize by 70%
move behind your bear.
open ele34
copy and paste as new layer
resize by 70%
Move below your heart
add your copyright
name and your done.
Dont forget to save.
open ele32 copy and paste as new layer
open your tube copy and paste as new layer
Move below your ele32
Erase the botom part of the tube carefully.
Highlight your background layer
and open a paper of choice
I am using pp2
copy and paste as new layer
go to layer and load and save mask
merge mask group
Add a drop shadow to your mask
open ele15
copy and paste as new layer
resize by 40%
move to the bottom right
open ele9
copy and paste as new layer
resize by 70%
move behind your bear.
open ele34
copy and paste as new layer
resize by 70%
Move below your heart
add your copyright
name and your done.
Dont forget to save.
Tuesday, January 26, 2010
Be Mine
A simple but sweet tut
Scrap kit Devilish Love by Jules.
You can purchase this wonderful kit Here
Tube is By Ismael Rac. Do not use unless you have a proper liscence to do so
You can purchase his work @ Artistic Minds -AMI
Mask by Weescotslass Creations

Create New Raster Layer 700x700
you can resize it later if you want.Open Element 8 copy and paste as new layer
resize down by 25%
Open your tube
Copy and paste as new layer
place in the center of your canvas
open paper2 copy and paste as new layer
move below your tube and frame layer
resize down by 40%
Open mask of choice
I am using WSL Mask 84
Load from image
Merge mask group
open element 20
copy and paste as new layer
resize down by 20%
Place to the left of your frame
Near the bottom
open element 19
Copy and paste as new layer
resize down by 20%
Move top right
below your tube layer (see mine for placement)
open element 33
copy and paste as new layer
resize down by 30%
Place below your little Devil layer
open your be mine words
copy and paste as new layer
resize down by 20&
Move the the bottom center
add your name and copy right
your done. It is a simple but sweet tag.
You can resize if you wish.
Friday, September 18, 2009
Witches Brew
New Halloween tut using a FTU kit.
Just a lil Spook FTU kit by ScrapsbyDMG
Tube of choice. I am using Ismael Rac. You can purchase his work here
Mask of choice. I am using Mask 43 by Weescotslass Creations
this tutorial was written 17 September 2009, by me. Any similarities is completely coincidental.

Create new Raster Layer 600x600
Open frame 3 copy and paste as new layer
resize by 80%
Open tube of choice. I am using the work of
Ismael Rac
Copy and paste tube as a new layer
Move below your frame layer
Grab your magic wand
Click inside the frame, go to selections
Invert and highlight your tube layer and delete.
Open your paper of choice
I am using paper 16
Copy and paste as new layer
move below your tube layer
Go to layers, load/save mask of choice
I am using WSL43
Merge group
Copy and paste your tube once agian
Resize by 90%
mirror and move to the left..
highlight your tube that is in the frame
Add the lighten effect on her and take your
transparency to 94%
open spiderweb 1
copy and paste as new layer
Move above your mask layer
Open spider 2
Copy and paste as new layer
resizing by 30% Move to the top right of your frame
duplicate and Mirror
Open your cauldron
Copy and paste as new layer
resizing by 30%
Move to the bottom right of your frame
open your cat, copy and paste as new layer
resizing by 30%
Move below tube layer 2.
duplicate and mirror.
The second cat should be near your cauldron
Move it below your Cauldron
Add word art of choice
Name and copy right
Save and your complete.
Please send me your results I would love to see them
scrapsbysamantha@gmail.com
Just a lil Spook FTU kit by ScrapsbyDMG
Tube of choice. I am using Ismael Rac. You can purchase his work here
Mask of choice. I am using Mask 43 by Weescotslass Creations
this tutorial was written 17 September 2009, by me. Any similarities is completely coincidental.

Create new Raster Layer 600x600
Open frame 3 copy and paste as new layer
resize by 80%
Open tube of choice. I am using the work of
Ismael Rac
Copy and paste tube as a new layer
Move below your frame layer
Grab your magic wand
Click inside the frame, go to selections
Invert and highlight your tube layer and delete.
Open your paper of choice
I am using paper 16
Copy and paste as new layer
move below your tube layer
Go to layers, load/save mask of choice
I am using WSL43
Merge group
Copy and paste your tube once agian
Resize by 90%
mirror and move to the left..
highlight your tube that is in the frame
Add the lighten effect on her and take your
transparency to 94%
open spiderweb 1
copy and paste as new layer
Move above your mask layer
Open spider 2
Copy and paste as new layer
resizing by 30% Move to the top right of your frame
duplicate and Mirror
Open your cauldron
Copy and paste as new layer
resizing by 30%
Move to the bottom right of your frame
open your cat, copy and paste as new layer
resizing by 30%
Move below tube layer 2.
duplicate and mirror.
The second cat should be near your cauldron
Move it below your Cauldron
Add word art of choice
Name and copy right
Save and your complete.
Please send me your results I would love to see them
scrapsbysamantha@gmail.com
Subscribe to:
Posts (Atom)
My Blinkie ☆