About Me ☆

Hello, I am Sami, the Girl behind Guilty Pleasures. I have been
writing tutorials since May 22, 2009. My first tutorial was called Twilight Obsession. How I got my name is simple. I found tagging to be my Guilty Pleasure. I thought it fit perfectly. I am a designer as well. You can find links to my blogs on my top menu. If you have questions please feel free to ask. Other wise you can read more about me on my
ABOUT ME PAGE!
My Blogs☆

Store Manager ☆
CT Manager☆




Favorite Blogs ☆







My Hangouts☆


Showing posts with label Gothic Inspriations. Show all posts
Showing posts with label Gothic Inspriations. Show all posts
Tuesday, May 18, 2010
Chained to Pain

PTU Scrap Kit Chained to the Pain by Gothic Inspirations.
create new raster layer 750x700
Open your film strip and copy and paste as new layer
open poser 1 copy and paste as new layer
we are going to put a piece of her into each section of the frame
I duplicated her 3 times
and placed each layer below the frame
THe way i wanted it.
Grab your magic wand and select inside of each section of the
frame, go to selections, modify and expand by 2
Invert and delete each of the tube layers
open your black parchment
copy and paste as new layer
move below all others.
Resize up as needed and
carefully erase the parts that are not below the frame
Merge all three sections of Poser 1
and add a luminance legacy to those..
open your ball and chain
copy and paste as new layer
Resize up as needed
duplicate and paste on the top and bottom of the frame
open poser 2
copy and paste as new layer
resize down by 75%
Move above all other layers and on top of the frame.
To where she is laying on it..
open your teaser copy and paste as new layer
resize down by 75%
Move below the bottom ball& Chain
Duplicate and mirror
Open your BDSM Work art
copy and paste as new layer
Resize to your liking.
See mine for placement.
add your copyright and name
Save and your complete.
open poser 1 copy and paste as new layer
we are going to put a piece of her into each section of the frame
I duplicated her 3 times
and placed each layer below the frame
THe way i wanted it.
Grab your magic wand and select inside of each section of the
frame, go to selections, modify and expand by 2
Invert and delete each of the tube layers
open your black parchment
copy and paste as new layer
move below all others.
Resize up as needed and
carefully erase the parts that are not below the frame
Merge all three sections of Poser 1
and add a luminance legacy to those..
open your ball and chain
copy and paste as new layer
Resize up as needed
duplicate and paste on the top and bottom of the frame
open poser 2
copy and paste as new layer
resize down by 75%
Move above all other layers and on top of the frame.
To where she is laying on it..
open your teaser copy and paste as new layer
resize down by 75%
Move below the bottom ball& Chain
Duplicate and mirror
Open your BDSM Work art
copy and paste as new layer
Resize to your liking.
See mine for placement.
add your copyright and name
Save and your complete.
Thursday, April 8, 2010
Vindictive Pleasure
So this one I was playing around with and It come out..
I love how it turned out.. Unfortunately I have no tut for it yet.
But hopefully soon..

Scrap kit is PTU from Gothic Inspirations
You can purchase it in her Store
Vindictive 1
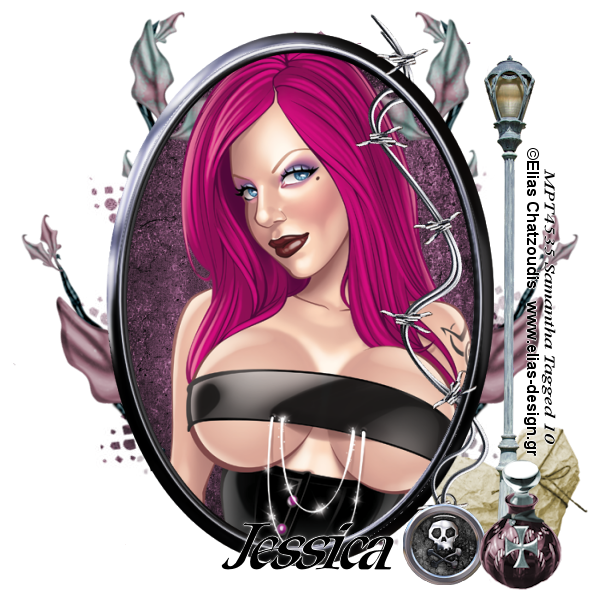
This is Tutorial 1 with a New PTU kit by Gothic Inspirartions
You can purchase this beautiful kit at her New Store
Tube is the beautiful art work of Elias Chatzoudis.
You can purchase his work here
Create New raster layer 600x600
Open frame 2
copy and paste as new layer
open your tube
grab the close up layer copy and paste
Move below your frame layer
Grab your eraser and carefully erase
the part of the tube that is below the frame
Open paper 13
copy and paste as new layer
move below your tube layer
Go to layers Load mask from disk
Choose your mask and merge group.
I am using Vix_mask148 you can download from http://www.freewebs.com/vixpsp/masks.htm
Open your parchment
copy and paste as new layer
Move above the mask layer
Grab your eraser and carefully erase the
part that is on the outside of the frame
Open your leaves
Copy and paste as new layer
Free rotate right by 40%
Plce below your tube layer
Grab your eraser and erase the part of the
leave that is inside the frame
See mine for ideas.
Mirror and dupliate the leaves and erase those as well
Open your lamp post copy and paste as new layer
resize down by 70% and move to the right
above all layers
Open your potion bottle
copy and paste as new layer
resize to your liking and place to the right
at the base of your lamppost.
open your heart
copy and paste as new layer
Resize to your liking and move below the lamppost
add your name and copyright and save
Open frame 2
copy and paste as new layer
open your tube
grab the close up layer copy and paste
Move below your frame layer
Grab your eraser and carefully erase
the part of the tube that is below the frame
Open paper 13
copy and paste as new layer
move below your tube layer
Go to layers Load mask from disk
Choose your mask and merge group.
I am using Vix_mask148 you can download from http://www.freewebs.com/vixpsp/masks.htm
Open your parchment
copy and paste as new layer
Move above the mask layer
Grab your eraser and carefully erase the
part that is on the outside of the frame
Open your leaves
Copy and paste as new layer
Free rotate right by 40%
Plce below your tube layer
Grab your eraser and erase the part of the
leave that is inside the frame
See mine for ideas.
Mirror and dupliate the leaves and erase those as well
Open your lamp post copy and paste as new layer
resize down by 70% and move to the right
above all layers
Open your potion bottle
copy and paste as new layer
resize to your liking and place to the right
at the base of your lamppost.
open your heart
copy and paste as new layer
Resize to your liking and move below the lamppost
add your name and copyright and save
Wednesday, March 17, 2010
Dark Beauty
This Beautiful tutorial is featuring a
wonderful scrapkit by Jessica @ Gothic Inspirations
It is part of February' s DarkCravings Blog Train. You
can get this kit here
can get this kit here
Artwork is By Ismael Rac.
Please do not use if you dont have a license to do so.
You can purchase his work and a license @ AMI .
Font is TheNautiGirl

This tutorial was written on 17March2010 by Samantha
This is completely my imagination.. Any similarities to this is completely Coincidental.
Create new Raster layer 600x600
open frame 3 copy and paste as new layer
open your tube copy and paste as new layer
move below your frame
Grab your magic wand
highlight your frame layer
select inside the frame
Once you see the marching ants
Go to selections, modify and expand by 9
highlight your tube layer
Go to selections, invert and hit delete
open your tagback grid copy and paste as new layer
resize down by 90%
Move below your tube layer
open paper 14 copy and paste as new layer
Move just about your tagback layer
Grab your eraser and carefully erase the paper
On the outside of the frame.
go back to your tube layer and Add Luminace Legacy to it
Mirror your tube
open the cross with ribbon copy and paste as new later
Resize down by 80 %
Move to the top left of your frame
Open your tube once again
Copy and paste as new layer
Make sure it is above all other layers
Mirror and move to the right
open the bloodsplatter
copy and paste as new layer
Move just above your tag back layer
Duplicate 4 times and place in the
4 corners of the frame
Add your name and copyright.
dont forget to save. Your done..
open frame 3 copy and paste as new layer
open your tube copy and paste as new layer
move below your frame
Grab your magic wand
highlight your frame layer
select inside the frame
Once you see the marching ants
Go to selections, modify and expand by 9
highlight your tube layer
Go to selections, invert and hit delete
open your tagback grid copy and paste as new layer
resize down by 90%
Move below your tube layer
open paper 14 copy and paste as new layer
Move just about your tagback layer
Grab your eraser and carefully erase the paper
On the outside of the frame.
go back to your tube layer and Add Luminace Legacy to it
Mirror your tube
open the cross with ribbon copy and paste as new later
Resize down by 80 %
Move to the top left of your frame
Open your tube once again
Copy and paste as new layer
Make sure it is above all other layers
Mirror and move to the right
open the bloodsplatter
copy and paste as new layer
Move just above your tag back layer
Duplicate 4 times and place in the
4 corners of the frame
Add your name and copyright.
dont forget to save. Your done..
Subscribe to:
Posts (Atom)
My Blinkie ☆