About Me ☆

Hello, I am Sami, the Girl behind Guilty Pleasures. I have been
writing tutorials since May 22, 2009. My first tutorial was called Twilight Obsession. How I got my name is simple. I found tagging to be my Guilty Pleasure. I thought it fit perfectly. I am a designer as well. You can find links to my blogs on my top menu. If you have questions please feel free to ask. Other wise you can read more about me on my
ABOUT ME PAGE!
My Blogs☆
Store Manager ☆
CT Manager☆





Favorite Blogs ☆







My Hangouts☆

Showing posts with label Twilight. Show all posts
Showing posts with label Twilight. Show all posts
Monday, October 15, 2012
Twilight Nights

PTU Kit - Twilight Nights by Lins Creations
You can purchase her kits at Scrappin Naturally
Artwork of Ismael Rac, you can purchase at his store here
You can purchase her kits at Scrappin Naturally
Artwork of Ismael Rac, you can purchase at his store here
New transparent raster layer 700x700, You ca resize later if needed.
Open frame 20 copy and paste as new layer
resize down by 80% about 7 times, Place in the center
Open paper 18 copy and paste as new layer
Move below the frame layer, resize down by 80% about 4 times
Erase all parts on the outside of the frame layer
Open the Bella Tube copy and paste as new layer
resize down 1 time by 80% Move below the frame layer
erase all parts on the outside of the frame
add a luminance legacy
open element 59 copy and paste as new layer
copy and paste as new layer
resize down by 80% about 8 times
Move above the frame layer and to the bottom
open element 44 copy and paste as new layer
resize down by 80% about 6 times
Move below the ribbon layer and to the left
open the edward tube copy and paste as new layer
resize down 1 time by 80%
Mirror and move to the left
above all other layers
open element 8 copy and paste as new layer
resize down by 80% about 6 times move to the right
open element 61 copy and paste as new layer
resize down by 80% about 7 times
Move directly above the frame layer and erase the part below on the back
side of the wolf
open element 15 copy and paste as new layer
resize down to desired
Move above all other layers and to the right of the books
open element 51 copy and paste as new layer
resize down by 80% about 6 times
Move to the right directly above the frame layer
open element 9 copy and paste as new layer
resize down by 80% about 5 times
move direcltly above the frame layer and erase
all parts on the outside of the elements
add your name copyright and save

Wednesday, March 24, 2010
I love Twilight
Scrap kit By Grunge &Glitter
You can purchase this kit @ GrungeandGlitter Store.
Tube is a Free to Use tube By Zindy S.D. Nielsen

Create new raster layer 600x600
Open frame2 Copy and paste as new layer
resize by 80%
open tube
hide the copyright layer
Make sure your Tube layer is highlighted
Copy and paste as new layer
Place the faces center of the frame
highlighting your frame layer
Grab your magic wand and select inside the frame
Go to Selections Modify and expand by 8
Highlight your tube layer
Go to selection and invert
Hit Delete
Open paper 7
copy and paste as new layer
Move below all other layers
Go to layers load/save mask.
I am using Mask 219 By Weescotslass Creations
Merge mask Group
open your doodle
copy and paste as new layer
Move below your mask layer
Duplicate, mirror and flip
Open your rose
copy and paste as new layer
resize by 50% and move to the bottom left
of your frame
Open your key
copy and paste as new layer
resize by 50 and then again by 60
free rotate to the left by 14%
See mine for placement
Open word art 5
Copy and paste as new layer
resize by 60%
Move to the bottom of your frame
Add your name and copyright.
Save and your done..
Open frame2 Copy and paste as new layer
resize by 80%
open tube
hide the copyright layer
Make sure your Tube layer is highlighted
Copy and paste as new layer
Place the faces center of the frame
highlighting your frame layer
Grab your magic wand and select inside the frame
Go to Selections Modify and expand by 8
Highlight your tube layer
Go to selection and invert
Hit Delete
Open paper 7
copy and paste as new layer
Move below all other layers
Go to layers load/save mask.
I am using Mask 219 By Weescotslass Creations
Merge mask Group
open your doodle
copy and paste as new layer
Move below your mask layer
Duplicate, mirror and flip
Open your rose
copy and paste as new layer
resize by 50% and move to the bottom left
of your frame
Open your key
copy and paste as new layer
resize by 50 and then again by 60
free rotate to the left by 14%
See mine for placement
Open word art 5
Copy and paste as new layer
resize by 60%
Move to the bottom of your frame
Add your name and copyright.
Save and your done..
Monday, February 22, 2010
Bella's Heart
Bella's Heart is using a beautiful Kit
by Dark Pheonix Designs, It is a PTU Scrap Kit.
You can visit her blog here.
Mask 219 is by Weescotslass Creations
Images from Twilight, you can find them on Google.

This tutorial was written on 22 February 2010, but Samantha
Made from my own imagination. Any similarities ic completely coincidental.
Create new raster layer 650x650
Open paper 4 copy and paste as new layer
Resize to your liking
Hide that layer we will get back to that.
Open Element 17 copy and paste as new layer
resize by 70%
take your image copy and paste as new layer
Place below the Element 17
erase what is sticking out of the sides of the frame
Open element 10 copy and paste as new layer
resize by 60%, move to the left
free rotate by 20 % to the left
Open element 12 copy and paste as new layer
resize by 20 % and move to the left
PLace the circle over one of the ones on the frame
Move below element 10
Open element 9
copy and paste as new layer
resize by 40%
Move to the left
place over your heart
And free rotate to the left by 10%
Move below your heart layer.
Unhide you paper layer
go to layer, load/save mask
I am using mask 219 By Weescotlass
merge mask group and resize to your liking
Add your name and copy right.
Your done.
Monday, August 31, 2009
My Heart and Soul
A beautiful scrapkit was used for this tut
Love Story by Naughty Creations. You can find her here
Tube of choice. I am using the artwork of Irene Shpak.Do not use unless you have a proper license to do so. You can purchase her work here
Mask of choice. I am using a mask by Weescotslass Creations
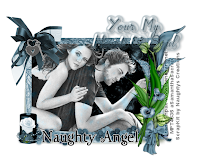
This tutorial was written on 31August2009 by Samantha. All similarities to this tutorial is completely coincidental.
Create new Raster Layer 600x600
Flood fill white
Copy and paste frame 4 as a new layer
Open tube copy and paste as new layer
Moving below your frame layer
Mirror and resize by 70%
Grab your magic wand, Highlight your frame layer
Clicking inside the frame, selections modify
expand by 10%, highligh your tube layer
Selections, invert and hit delete
change the settings on your tube layer to luminance legacy
Open your paper of choice, I am using pp2
Copy and paste as new layer Moving it below your tube layer
Go to layers load/save mask I am using Mask 238
Merge mask group and resize by 80%, Free rotate left by 90 degrees
Open paper of choice, I am using pp11
Copy and paste as new layer, moving below your tube layer
Grab your and click inside the frame. Make sure you have all
the little areas of the frame selected
Selections, Modify, Feather by 5%
Then Selections, Modify, expand by 10%
Highlight your paper layer,Selections, invert and hit delete.
Now its time for your elements
Open your bowlocknkey copy and paste as new layer
Move above your frame layer resizing by 50%
Move to the top left corner of your frame
Open Flowers3 copy and paste as new layer
resizing by 61% move to the bottom right of your frame
See mine for placement.
Open your candle, copy and paste as new layer
resizing by 40% Move to the bottom left of your frame
Open flower5 copy and paste as new layer
resizing by 20% move above your candle layer
with your eraser tool carefully erase the part
that is below the candle
Open up the word art of choice, I am using wordart 5
copy and paste as new layer moving to the top of your frame
and slightly to the right, resizing by 80% and adding
a drop shadow of choice
Add your copyright, name and save and you are done.
I would love to see what you come up with.
Please send to scrapsbysamantha@blogspot.com
Love Story by Naughty Creations. You can find her here
Tube of choice. I am using the artwork of Irene Shpak.Do not use unless you have a proper license to do so. You can purchase her work here
Mask of choice. I am using a mask by Weescotslass Creations

This tutorial was written on 31August2009 by Samantha. All similarities to this tutorial is completely coincidental.
Create new Raster Layer 600x600
Flood fill white
Copy and paste frame 4 as a new layer
Open tube copy and paste as new layer
Moving below your frame layer
Mirror and resize by 70%
Grab your magic wand, Highlight your frame layer
Clicking inside the frame, selections modify
expand by 10%, highligh your tube layer
Selections, invert and hit delete
change the settings on your tube layer to luminance legacy
Open your paper of choice, I am using pp2
Copy and paste as new layer Moving it below your tube layer
Go to layers load/save mask I am using Mask 238
Merge mask group and resize by 80%, Free rotate left by 90 degrees
Open paper of choice, I am using pp11
Copy and paste as new layer, moving below your tube layer
Grab your and click inside the frame. Make sure you have all
the little areas of the frame selected
Selections, Modify, Feather by 5%
Then Selections, Modify, expand by 10%
Highlight your paper layer,Selections, invert and hit delete.
Now its time for your elements
Open your bowlocknkey copy and paste as new layer
Move above your frame layer resizing by 50%
Move to the top left corner of your frame
Open Flowers3 copy and paste as new layer
resizing by 61% move to the bottom right of your frame
See mine for placement.
Open your candle, copy and paste as new layer
resizing by 40% Move to the bottom left of your frame
Open flower5 copy and paste as new layer
resizing by 20% move above your candle layer
with your eraser tool carefully erase the part
that is below the candle
Open up the word art of choice, I am using wordart 5
copy and paste as new layer moving to the top of your frame
and slightly to the right, resizing by 80% and adding
a drop shadow of choice
Add your copyright, name and save and you are done.
I would love to see what you come up with.
Please send to scrapsbysamantha@blogspot.com
Sunday, August 30, 2009
Eternal Love
Scrap Kit Love Bites By Addictive pleasures
Twilight image of choice
Fonts of Choice
Word art of Choice
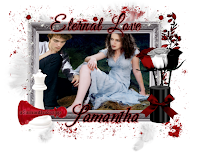
Create New Raster Layer 600x600 You can resize it later
Flood Fill White
Open frame 3 copy and paste as new layer
Resizing by 50%
Grab your magic wand and select inside the frame
Create new raster layer
Go to selections modify expand by 10%
Make sure your new layer is highlighted
Copy and paste image of choice into selection
Move below your frame layer
Open up your curtain bling
Copy and paste as new layer
Resize by 55%
Move above your frame
Open your blood element
Copy and paste as new layer
Resize by 110%
Moving below your image layer
Open up feathers 3
Copy and paste as new layer
Make sure it is above your blood splat layer
Open up chess1 copy and paste as new layer
Resizing by 30%
Move above to the top
Place bottom left of the frame
Open Chess2 copy and paste as new layer
Resizing by 40% Free Rotate Right by 90%
See mine for placement
Open Leaves copy and paste as new layer
Resizing by 60%
Move to the right below your image layer
Open Rose2 Copy and paste as new layer
Resizing by 50% move to the right of your frame
Move this above all other layers
Open Rose3 Copy and paste as new layer
Resizing by 50% move to the right near your white rose
Free Rotate to the Right by 10%
Move Below your white Rose
Open Rose 4 copy and paste as new layer
Resize by 50% move to the right near the right rose
Free Rotate left by 10%
Move below your white rose
See Mine for placement of the roses
Open your candle copy and paste as new layer
Resizing by 40% move above the rose
See mine for placement
Open up Bow3 copy and paste as new layer
Resizing by 30%
Move to the center of your candle
I have wrote Eternal Love
Used the Good Vibrations Font
Eye Candy 4000
Gradient Glow
Color Red ( Glow Width 3 pixels, Soft Corners 20%, Overall Opacity 60%)
Move that to the top of your frame
(see mine for placement )
Add your name, Copyright and save
you are done
Twilight image of choice
Fonts of Choice
Word art of Choice

Create New Raster Layer 600x600 You can resize it later
Flood Fill White
Open frame 3 copy and paste as new layer
Resizing by 50%
Grab your magic wand and select inside the frame
Create new raster layer
Go to selections modify expand by 10%
Make sure your new layer is highlighted
Copy and paste image of choice into selection
Move below your frame layer
Open up your curtain bling
Copy and paste as new layer
Resize by 55%
Move above your frame
Open your blood element
Copy and paste as new layer
Resize by 110%
Moving below your image layer
Open up feathers 3
Copy and paste as new layer
Make sure it is above your blood splat layer
Open up chess1 copy and paste as new layer
Resizing by 30%
Move above to the top
Place bottom left of the frame
Open Chess2 copy and paste as new layer
Resizing by 40% Free Rotate Right by 90%
See mine for placement
Open Leaves copy and paste as new layer
Resizing by 60%
Move to the right below your image layer
Open Rose2 Copy and paste as new layer
Resizing by 50% move to the right of your frame
Move this above all other layers
Open Rose3 Copy and paste as new layer
Resizing by 50% move to the right near your white rose
Free Rotate to the Right by 10%
Move Below your white Rose
Open Rose 4 copy and paste as new layer
Resize by 50% move to the right near the right rose
Free Rotate left by 10%
Move below your white rose
See Mine for placement of the roses
Open your candle copy and paste as new layer
Resizing by 40% move above the rose
See mine for placement
Open up Bow3 copy and paste as new layer
Resizing by 30%
Move to the center of your candle
I have wrote Eternal Love
Used the Good Vibrations Font
Eye Candy 4000
Gradient Glow
Color Red ( Glow Width 3 pixels, Soft Corners 20%, Overall Opacity 60%)
Move that to the top of your frame
(see mine for placement )
Add your name, Copyright and save
you are done
GoodBye Bella
I love the Goodbye Bella Scrap By Vicki @ PinkPrincessScraps
So I had to write a tut using it.
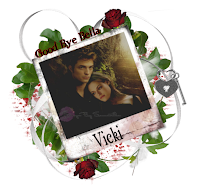
I would like to see your results
This is written by me on 21 August 2009
Supplies Needed
Tube or image of choice I am using one I found from Google
Scrap of choice, I am using GoodBye Bella by Vicki you can purchase it @ PinkPrincessScraps
Mask of choice ( i am using WSL_170 by Weescotslass
Create new image 700x700 ( we will resize it later)
Flood Fill White
Open your kit. Grab the goodbyebella_ele38_pp frame
Copy and paste onto your image place in the center
resize by 60% free rotate left by 20%
grab your magic wand and select inside your frame
Open your tube or image of choice
and paste into selection
I created a new raster layer, highlighted the new layer,
paste into selection
Open up a paper of choice. I am using goodbyebella_pp16
Copy and paste as a new layer.
Move below your other layers
Merge Group
Resize mask layer by 90%
Add your word art ( see mine for placing)
Now open up goodbyebella_ele13
Copy and paste as new layer
Move right above the mask layer
Open up goodbye bella_ele28
copy and paste as new layer
Move right above the mask layer
Below the feather. Move up a little
Open goodbyebella_ele48
copy and post as new layer
resize by 90
move below your image
open up goodbyebella_ele2
copy and paste as new layer
Move above your frame
resize by 30 %
See mine for placement.
Open goodbyebella _ele11
copy and paste as new layer
resize by 70
see mine for placement
duplicate and flip
Add your text and gradient glow of choice
add your copyright info
Add your name
Save and you are done
Remember send me your results I would love to see them..
So I had to write a tut using it.

I would like to see your results
This is written by me on 21 August 2009
Supplies Needed
Tube or image of choice I am using one I found from Google
Scrap of choice, I am using GoodBye Bella by Vicki you can purchase it @ PinkPrincessScraps
Mask of choice ( i am using WSL_170 by Weescotslass
Create new image 700x700 ( we will resize it later)
Flood Fill White
Open your kit. Grab the goodbyebella_ele38_pp frame
Copy and paste onto your image place in the center
resize by 60% free rotate left by 20%
grab your magic wand and select inside your frame
Open your tube or image of choice
and paste into selection
I created a new raster layer, highlighted the new layer,
paste into selection
Open up a paper of choice. I am using goodbyebella_pp16
Copy and paste as a new layer.
Move below your other layers
Merge Group
Resize mask layer by 90%
Add your word art ( see mine for placing)
Now open up goodbyebella_ele13
Copy and paste as new layer
Move right above the mask layer
Open up goodbye bella_ele28
copy and paste as new layer
Move right above the mask layer
Below the feather. Move up a little
Open goodbyebella_ele48
copy and post as new layer
resize by 90
move below your image
open up goodbyebella_ele2
copy and paste as new layer
Move above your frame
resize by 30 %
See mine for placement.
Open goodbyebella _ele11
copy and paste as new layer
resize by 70
see mine for placement
duplicate and flip
Add your text and gradient glow of choice
add your copyright info
Add your name
Save and you are done
Remember send me your results I would love to see them..
Saturday, August 29, 2009
Twilight Obsession

My first attempt at a tutorial So bare with me..
I am still learning that.. Maybe I will get better at it
some day.. I would love to see your results. Please
feel free to share them with me..
Written 22 May 2009 By Samantha
Corel Paintshop Pro X2 or any other versions
Template 73 by Sixxbug
Twilight Scrap kit by Missy @ scraps with Attitude.
You can purchase it here
Mask of choice i used WSL_171
Image of Choice..
Open your template hit Shift D to copy.
Close the origional
Open a paper of choice..
I used twilight paper 17
Select your left black rectangle
Invert selection.
highlight your paper and hit delete
Do the same for the right retangle.
Add your image or tube of choice.
Elements and words of choice
Add your mask, I used twilight paper 16
Merge Group
Add your copyright and dont forget to save.
Subscribe to:
Posts (Atom)
My Blinkie ☆