About Me ☆

Hello, I am Sami, the Girl behind Guilty Pleasures. I have been
writing tutorials since May 22, 2009. My first tutorial was called Twilight Obsession. How I got my name is simple. I found tagging to be my Guilty Pleasure. I thought it fit perfectly. I am a designer as well. You can find links to my blogs on my top menu. If you have questions please feel free to ask. Other wise you can read more about me on my
ABOUT ME PAGE!
My Blogs☆

Store Manager ☆

CT Manager☆


Favorite Blogs ☆


My Hangouts☆


Monday, August 31, 2009
My Heart and Soul
A beautiful scrapkit was used for this tut
Love Story by Naughty Creations. You can find her here
Tube of choice. I am using the artwork of Irene Shpak.Do not use unless you have a proper license to do so. You can purchase her work here
Mask of choice. I am using a mask by Weescotslass Creations
This tutorial was written on 31August2009 by Samantha. All similarities to this tutorial is completely coincidental.
Create new Raster Layer 600x600
Flood fill white
Copy and paste frame 4 as a new layer
Open tube copy and paste as new layer
Moving below your frame layer
Mirror and resize by 70%
Grab your magic wand, Highlight your frame layer
Clicking inside the frame, selections modify
expand by 10%, highligh your tube layer
Selections, invert and hit delete
change the settings on your tube layer to luminance legacy
Open your paper of choice, I am using pp2
Copy and paste as new layer Moving it below your tube layer
Go to layers load/save mask I am using Mask 238
Merge mask group and resize by 80%, Free rotate left by 90 degrees
Open paper of choice, I am using pp11
Copy and paste as new layer, moving below your tube layer
Grab your and click inside the frame. Make sure you have all
the little areas of the frame selected
Selections, Modify, Feather by 5%
Then Selections, Modify, expand by 10%
Highlight your paper layer,Selections, invert and hit delete.
Now its time for your elements
Open your bowlocknkey copy and paste as new layer
Move above your frame layer resizing by 50%
Move to the top left corner of your frame
Open Flowers3 copy and paste as new layer
resizing by 61% move to the bottom right of your frame
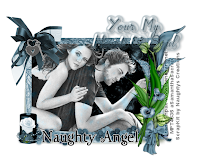
See mine for placement.
Open your candle, copy and paste as new layer
resizing by 40% Move to the bottom left of your frame
Open flower5 copy and paste as new layer
resizing by 20% move above your candle layer
with your eraser tool carefully erase the part
that is below the candle
Open up the word art of choice, I am using wordart 5
copy and paste as new layer moving to the top of your frame
and slightly to the right, resizing by 80% and adding
a drop shadow of choice
Add your copyright, name and save and you are done.
I would love to see what you come up with.
Please send to scrapsbysamantha@blogspot.com
Love Story by Naughty Creations. You can find her here
Tube of choice. I am using the artwork of Irene Shpak.Do not use unless you have a proper license to do so. You can purchase her work here
Mask of choice. I am using a mask by Weescotslass Creations

This tutorial was written on 31August2009 by Samantha. All similarities to this tutorial is completely coincidental.
Create new Raster Layer 600x600
Flood fill white
Copy and paste frame 4 as a new layer
Open tube copy and paste as new layer
Moving below your frame layer
Mirror and resize by 70%
Grab your magic wand, Highlight your frame layer
Clicking inside the frame, selections modify
expand by 10%, highligh your tube layer
Selections, invert and hit delete
change the settings on your tube layer to luminance legacy
Open your paper of choice, I am using pp2
Copy and paste as new layer Moving it below your tube layer
Go to layers load/save mask I am using Mask 238
Merge mask group and resize by 80%, Free rotate left by 90 degrees
Open paper of choice, I am using pp11
Copy and paste as new layer, moving below your tube layer
Grab your and click inside the frame. Make sure you have all
the little areas of the frame selected
Selections, Modify, Feather by 5%
Then Selections, Modify, expand by 10%
Highlight your paper layer,Selections, invert and hit delete.
Now its time for your elements
Open your bowlocknkey copy and paste as new layer
Move above your frame layer resizing by 50%
Move to the top left corner of your frame
Open Flowers3 copy and paste as new layer
resizing by 61% move to the bottom right of your frame
See mine for placement.
Open your candle, copy and paste as new layer
resizing by 40% Move to the bottom left of your frame
Open flower5 copy and paste as new layer
resizing by 20% move above your candle layer
with your eraser tool carefully erase the part
that is below the candle
Open up the word art of choice, I am using wordart 5
copy and paste as new layer moving to the top of your frame
and slightly to the right, resizing by 80% and adding
a drop shadow of choice
Add your copyright, name and save and you are done.
I would love to see what you come up with.
Please send to scrapsbysamantha@blogspot.com
Subscribe to:
Post Comments (Atom)
My Blinkie ☆

0 comments:
Post a Comment
Thank you for stopping by Guilty Pleasures.. I hope you enjoyed your visit here.. I appreciate any comments and any feedback that you may have.
Love & Hugs
Sami *aka* Guilty Pleasures