About Me ☆

Hello, I am Sami, the Girl behind Guilty Pleasures. I have been
writing tutorials since May 22, 2009. My first tutorial was called Twilight Obsession. How I got my name is simple. I found tagging to be my Guilty Pleasure. I thought it fit perfectly. I am a designer as well. You can find links to my blogs on my top menu. If you have questions please feel free to ask. Other wise you can read more about me on my
ABOUT ME PAGE!
My Blogs☆

Store Manager ☆

CT Manager☆


Favorite Blogs ☆


My Hangouts☆


Sunday, August 30, 2009
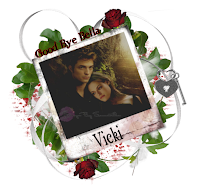
GoodBye Bella
I love the Goodbye Bella Scrap By Vicki @ PinkPrincessScraps
So I had to write a tut using it.
I would like to see your results
This is written by me on 21 August 2009
Supplies Needed
Tube or image of choice I am using one I found from Google
Scrap of choice, I am using GoodBye Bella by Vicki you can purchase it @ PinkPrincessScraps
Mask of choice ( i am using WSL_170 by Weescotslass
Create new image 700x700 ( we will resize it later)
Flood Fill White
Open your kit. Grab the goodbyebella_ele38_pp frame
Copy and paste onto your image place in the center
resize by 60% free rotate left by 20%
grab your magic wand and select inside your frame
Open your tube or image of choice
and paste into selection
I created a new raster layer, highlighted the new layer,
paste into selection
Open up a paper of choice. I am using goodbyebella_pp16
Copy and paste as a new layer.
Move below your other layers
Merge Group
Resize mask layer by 90%
Add your word art ( see mine for placing)
Now open up goodbyebella_ele13
Copy and paste as new layer
Move right above the mask layer
Open up goodbye bella_ele28
copy and paste as new layer
Move right above the mask layer
Below the feather. Move up a little
Open goodbyebella_ele48
copy and post as new layer
resize by 90
move below your image
open up goodbyebella_ele2
copy and paste as new layer
Move above your frame
resize by 30 %
See mine for placement.
Open goodbyebella _ele11
copy and paste as new layer
resize by 70
see mine for placement
duplicate and flip
Add your text and gradient glow of choice
add your copyright info
Add your name
Save and you are done
Remember send me your results I would love to see them..
So I had to write a tut using it.

I would like to see your results
This is written by me on 21 August 2009
Supplies Needed
Tube or image of choice I am using one I found from Google
Scrap of choice, I am using GoodBye Bella by Vicki you can purchase it @ PinkPrincessScraps
Mask of choice ( i am using WSL_170 by Weescotslass
Create new image 700x700 ( we will resize it later)
Flood Fill White
Open your kit. Grab the goodbyebella_ele38_pp frame
Copy and paste onto your image place in the center
resize by 60% free rotate left by 20%
grab your magic wand and select inside your frame
Open your tube or image of choice
and paste into selection
I created a new raster layer, highlighted the new layer,
paste into selection
Open up a paper of choice. I am using goodbyebella_pp16
Copy and paste as a new layer.
Move below your other layers
Merge Group
Resize mask layer by 90%
Add your word art ( see mine for placing)
Now open up goodbyebella_ele13
Copy and paste as new layer
Move right above the mask layer
Open up goodbye bella_ele28
copy and paste as new layer
Move right above the mask layer
Below the feather. Move up a little
Open goodbyebella_ele48
copy and post as new layer
resize by 90
move below your image
open up goodbyebella_ele2
copy and paste as new layer
Move above your frame
resize by 30 %
See mine for placement.
Open goodbyebella _ele11
copy and paste as new layer
resize by 70
see mine for placement
duplicate and flip
Add your text and gradient glow of choice
add your copyright info
Add your name
Save and you are done
Remember send me your results I would love to see them..
Subscribe to:
Post Comments (Atom)
My Blinkie ☆

0 comments:
Post a Comment
Thank you for stopping by Guilty Pleasures.. I hope you enjoyed your visit here.. I appreciate any comments and any feedback that you may have.
Love & Hugs
Sami *aka* Guilty Pleasures