About Me ☆

Hello, I am Sami, the Girl behind Guilty Pleasures. I have been
writing tutorials since May 22, 2009. My first tutorial was called Twilight Obsession. How I got my name is simple. I found tagging to be my Guilty Pleasure. I thought it fit perfectly. I am a designer as well. You can find links to my blogs on my top menu. If you have questions please feel free to ask. Other wise you can read more about me on my
ABOUT ME PAGE!
My Blogs☆

Store Manager ☆

CT Manager☆


Favorite Blogs ☆


My Hangouts☆


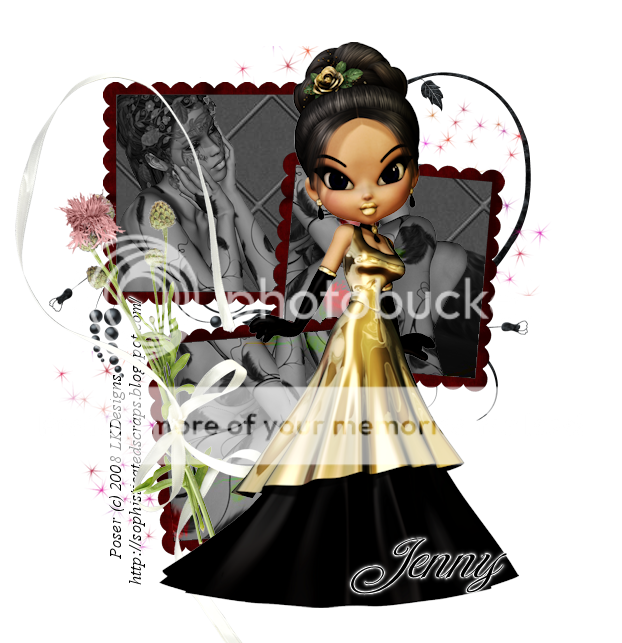
Wednesday, April 28, 2010
Unlikely Ballad
Scrap kit By Polkadot Scraps. Unlikely Ballad is a PTU kit
You can purchase this kit here
Tube is the art work of Ismael Rac. You can purchase his work
and a license to use at Artistic Minds Inc
Mask128 by Weescotslass Creations

This tutorial was written on 27 April 2010 by Samantha
Any similarities to this is completely coincidental
Create New raster layer 700x700
You can resize it later if you would like.
open frame 2 copy and paste as new layer
Open your tube copy and paste as new layer
Duplicate your frame and move one above the tube layer
Grab your eraser and carefully erase the bottom that is sticking out
from the frame . Once you have that done, hightlight the duplicate frame
layer and erase the part of the frame that covers the hair.
Open paper 1 copy and paste as new layer
move below all other layer
go to Layer load/save mask and open your mask of choice
Merge Mask group
Open element 16 copy and paste as new layer
Free rotate to the left by 10
Move to the left of the frame
Open element 14 copy and paste as new later
Move to the bottom left ( see mine for exact placement)
Open frame 6 copy and paste as new layer
move above your mask group
Grab your eraser and carefully erase the parts that is
on the inside of frame 2
Open elements 35 and 36
copy and paste both as new layer
Resize element 35 down by 30 % and move to the
bottom right of your frame
Resize element 36 down by 30% and move to
the right of element 35 Duplicate element36 and
place on the other side of element 35
( see mine for exact placement )
Add your name, Copyright and save your done.
Monday, April 19, 2010
His Lullaby
his Beautiful Kit is by Polkadot Scraps.
It is a PTU Kit. You can purchase this @ Twilight Scraps

Tube is a Zindy Free Tube. You can get Here
It is a PTU Kit. You can purchase this @ Twilight Scraps
Tube is a Zindy Free Tube. You can get Here
This tutorial was written on 4.19.2010 by Samantha by my own thought
Any similarities is completely coincidental
Create new raster layer 700x700
Open frame 7
copy and paste as new layer
Open your image
copy and paste as new layer
Move below your frame
Megre Down
resize down by 80%
Open element 5
copy and paste as new layer
Move below all other layers
add a drop shadow of choice
open paper 6
copy and paste as new layer
move below all others
Go layers load/save mask.
I am using Mask147 by Weescotslass creations
open element3
copy and paste as new layer
resize by 70%
then again by 60%
Move to the bottom left
open element 1
copy and paste as new layer
resize by 50%
Move infront of your paprer layer
to the bottom left
open element 55
copy and paste as new layer
move below the piano and music later
move to the left (see mine for placement)
open element 51
copy and paste as new layer
Move to the bottom
Add your name and copyright Save and your Done
A simple but Elegant tag
Saturday, April 17, 2010
Elegant Romance
It is a FTU Kit. No outside tubes or Masks Used.
Create new Raster layer 650x 650 open your fram cluster
copy and paste as new layer
reszie down by 20%
open paper 4
copy and paste as new layer
Move below the frames
Grab your magic wand and
click inside of the frames
ONE BY ONE
Go to selections, modify and expand by 7
Go to selections invert
Highlight your paper layer and hit delete
grab your dark swan
Copy and paste as new layer
Place different areas in easch part of your
frames
Add a luminance legacy to those.
open doddle 2
copy and paste as new layer
moving below your paper layerv in the center
open stardust
copy and paste as new layer
move to the top right below your paper
Duplicate and mirror
open poser2
copy and paste to ur liking
Placing in the center
open the flowers with the bow
copy and paste as new layer
resize to ur liking
Free rorate left by 90
Move to the left
Add your name and copyright ur done
Wednesday, April 14, 2010
Last Birthday
Scrap Kit by Brandi @ Grunge N Glitter
Her Kit Last Birthday is a PTU kit. Its on Sale for 1.99 @
Her Store.
Tube of choice. I am using the Work of Elias Chatzoudis
You can purchase his beautiful work and a license to use @
Font is TheNautiGirl

This tutorial was written by Me on 14 April 2010
any copies is completely coincidental. From my own hyper imagination
Create new raster layer 750x750
We can resize it later
Open Ribbon frame
copy and paste as new layer
resize down by 60
open close up layer of tube
copy and paste as new layer
move below frame
Grab your eraser and carefully erase
what is sticking out from the frame
open paper5 copy and paste as new layer
move below all other
Go to layer
load/save mask from disk
I am using Mask 219 From Weescotslass Creations
Merge mask group.
Resize mask layer down by 80
highlighting your tube layer
add a luminance Legacy to that
open your hearts and glitter
copy and paste as new layer
Move Below your Mask layer
Duplicate Frame Layer and hide the
duplicated layer
Merge the ribbon frame and
close up tube and
Mirror
Open your tube again copy and paste
as new layer
unhide ribbon and move below the tube
duplicate ribbon frame again and move above
the tube layer
Place to the right
Like mine
Grab your eraser
highlight your tube layer and
erase the parts of the tube below the frame
Now hightlight your other ribbon and
erase the parts that are coving the tube
open your cake
copy and paste as new layer
resize by 40%
Move to the blottom left
open gift 1
copy and paste as new layer
resize down by 30%
Move to the right of the cake
Open gift2
copy and paste as new layer
resize down by 30
move beside the other one..
Open all 3 balloons
copy and paste as new layer
Resize the first by 50
Second by 40 and the 3rd by 30
Place behind the cake layer
See mine for exact placement
open your tag 1
copy and paste as new layer
resize down to your liking
Place infront of your cake and presents
Add your name and copyright
Save and your complete
Thursday, April 8, 2010
Vindictive Pleasure
So this one I was playing around with and It come out..
I love how it turned out.. Unfortunately I have no tut for it yet.
But hopefully soon..

Scrap kit is PTU from Gothic Inspirations
You can purchase it in her Store
Vindictive 1
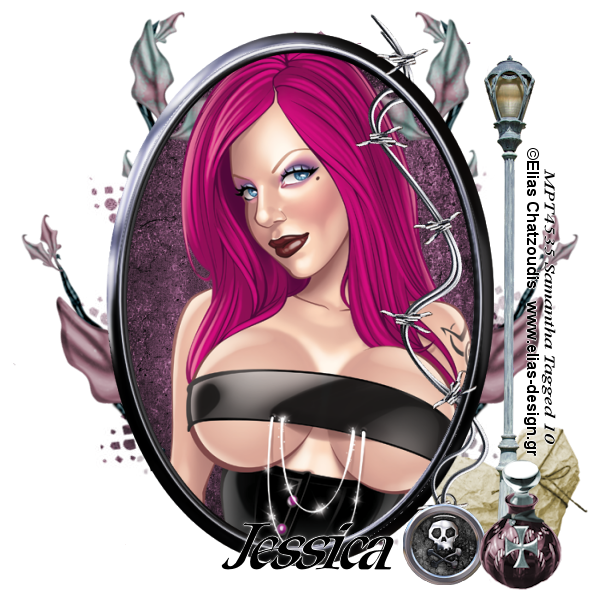
This is Tutorial 1 with a New PTU kit by Gothic Inspirartions
You can purchase this beautiful kit at her New Store
Tube is the beautiful art work of Elias Chatzoudis.
You can purchase his work here
Create New raster layer 600x600
Open frame 2
copy and paste as new layer
open your tube
grab the close up layer copy and paste
Move below your frame layer
Grab your eraser and carefully erase
the part of the tube that is below the frame
Open paper 13
copy and paste as new layer
move below your tube layer
Go to layers Load mask from disk
Choose your mask and merge group.
I am using Vix_mask148 you can download from http://www.freewebs.com/vixpsp/masks.htm
Open your parchment
copy and paste as new layer
Move above the mask layer
Grab your eraser and carefully erase the
part that is on the outside of the frame
Open your leaves
Copy and paste as new layer
Free rotate right by 40%
Plce below your tube layer
Grab your eraser and erase the part of the
leave that is inside the frame
See mine for ideas.
Mirror and dupliate the leaves and erase those as well
Open your lamp post copy and paste as new layer
resize down by 70% and move to the right
above all layers
Open your potion bottle
copy and paste as new layer
resize to your liking and place to the right
at the base of your lamppost.
open your heart
copy and paste as new layer
Resize to your liking and move below the lamppost
add your name and copyright and save
Thursday, April 1, 2010
Miss Understood

SUPPLIES NEED
MISS UNDERSTOOD PTU KIT BY Grunge & Glitter
Tube by Keith Garvey
Mask 221 by Weescotslass Creations
This tutorial was written on April 1, 2010 by Samantha
All similarities to this is complete coincidental.
Create new raster layer 700x700
We can resize it later if you choose.
Open frame 5 copy and paste as new layer
Place in the center of your layer
Open your tube
copy and paste close up layer
Move below your frame layer
grab your eraser and hightlight the tube layer
carefully erase the parts of the tube that
are sticking out of the frame.
Open paper 17
copy and paste as new layer
move below your tube layer
go to Layers
Load/save mask
open mask of choice
once you get that done
Merge mask group
Now hightlight your tube layer
add a luminace legacy to it.
open your barbed wire
copy and paste as new layer
Free rotate left by 90
Move above all other layers
Resize by 65%
Place on the left side of your frame
Dupplicate and mirror
adjust if you need to
open heart 5
copy and paste as new layer
free rotate left by 22%
Resize by 40%
Move to the bottom left of the frame
open the key
copy and paste as new layer
resize by 405
Free rotate left by 22
move below your heart layer
open skull1
copy and paste as new layer
resize by 40%
Add a gradient glow and resize again by 70%
Move to the bottom right
Open your tube again.
Grab your full body tube
copy and paste as new layer
Mirror and place to the right..
Grab your text tool.
TYPE out MISS UNDERSTOOD
In a font of Choice convert to raster layer
Add a gradient glow.
Duplicate Move below your orgional text layer
Add a constellation to it.
Setting of choice
Add your copyright and name
Save and done
Subscribe to:
Comments (Atom)
My Blinkie ☆
