About Me ☆

Hello, I am Sami, the Girl behind Guilty Pleasures. I have been
writing tutorials since May 22, 2009. My first tutorial was called Twilight Obsession. How I got my name is simple. I found tagging to be my Guilty Pleasure. I thought it fit perfectly. I am a designer as well. You can find links to my blogs on my top menu. If you have questions please feel free to ask. Other wise you can read more about me on my
ABOUT ME PAGE!
My Blogs☆
Store Manager ☆
CT Manager☆


Favorite Blogs ☆







My Hangouts☆

Showing posts with label Pimp my Tags With Scraps. Show all posts
Showing posts with label Pimp my Tags With Scraps. Show all posts
Sunday, December 30, 2012
Pirate Girl

Artwort by Keith Garvey, You can purchase at his store here
PTU Scrap Kit is Don't be a Pirate by Alika Scraps You can purchase at
mask of choice
New raster layer 600x600
open paper 1 copy and paste as new layer
go to layers new mask layer
from image, select from drop down and hit ok
i am using one that was preloaded
Merge group
open full length tube layer
copy and paste as new layer
resize down 1 time by 80%
open as 7 copy and paste as new layer
resize down by 80% 3 times and move below the tube layer
to the center of the mask layer
open as24 copy and pste as new layer
flip and move to the bottom below the tube layer
move to the bottom to where the tube is sitting on it
open as44 copy and paste as new layer
resize down by 80% to your liking
Move below as24, and to the center
open as41 copy and paste as new layer
resize down 5 times by 80%
Move to the right below as24
open as19 copy and paste as new layer
resize down 4 times by 80% move to the left
duplicate and mirror to the right
open as37 copy and paste as new layer
resize down 5 times by 80%
place as desired
open as 49 copy and paste as new layer
resize down 3 times by 80%
Move below the tube layer and to the right
add your name copyright and save
New raster layer 600x600
open paper 1 copy and paste as new layer
go to layers new mask layer
from image, select from drop down and hit ok
i am using one that was preloaded
Merge group
open full length tube layer
copy and paste as new layer
resize down 1 time by 80%
open as 7 copy and paste as new layer
resize down by 80% 3 times and move below the tube layer
to the center of the mask layer
open as24 copy and pste as new layer
flip and move to the bottom below the tube layer
move to the bottom to where the tube is sitting on it
open as44 copy and paste as new layer
resize down by 80% to your liking
Move below as24, and to the center
open as41 copy and paste as new layer
resize down 5 times by 80%
Move to the right below as24
open as19 copy and paste as new layer
resize down 4 times by 80% move to the left
duplicate and mirror to the right
open as37 copy and paste as new layer
resize down 5 times by 80%
place as desired
open as 49 copy and paste as new layer
resize down 3 times by 80%
Move below the tube layer and to the right
add your name copyright and save

Monday, August 31, 2009
Zirconia
Scrapkit is Zirconia by Tammykat @ Pimp My Tags W/ Scraps
You can check out Their Blog Here
Artwork is by Elias Chatzoudis. Do not use unless you have a proper license to do so.
You can purchase his tubes here
Mask of choice. i am using Mask 81 by Weescotlass Creations
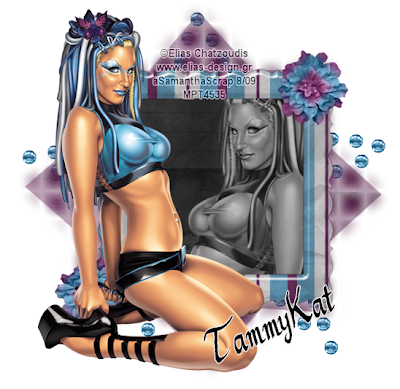
This tutorial was written by me Samantha using Corel Paintshop Pro X2 on
31 August 2009. All similarities to this is completely coincidental.
Create new raster layer 600x600
Flood fill white
open frame of choice
I am using acrylicframe2
copy and paste as new layer
resize by 80% and center
copy and paste tube of choice as new layer
mirror and resize up by 115%
Move to the right of the frame and below the frame
go to selections, Modify and expand by 10
highlight your tube layer
selections invert and hit delete
Take the settings on your tube to luminance legacy
opacity down to 69%
Now open up the paper of choice
I am using solidblack paper
Copy and paste as new layer, move below your tube layer
highlight your frame layer
grab your magic wand and click inside the frame
Go to selections, modify expand by 10
highlight your paper layer, selections invert and hit delete
Copy and paste your tube layer once again
Moving above your frame layer to the left
Open up another paper
I am using purple solid paper
copy and paste as new layer
Moving above your white background
Open up your mask of choice I am using Mask 88
Go to layers, New Mask layer, from Image
Merge group
Now to your elements
Open up purpleblue flower copy and paste as new layer
Resize by 65%
Duplicate, Mirror and flip
Move below your tube layer
Open up your bluegemstar
copy and paste as new layer
Moving right above your mask group
Add your copyright, name, save and your done
I would love to see your results. You can send them to me at
scrapsbysamantha@gmail.com
You can check out Their Blog Here
Artwork is by Elias Chatzoudis. Do not use unless you have a proper license to do so.
You can purchase his tubes here
Mask of choice. i am using Mask 81 by Weescotlass Creations

This tutorial was written by me Samantha using Corel Paintshop Pro X2 on
31 August 2009. All similarities to this is completely coincidental.
Create new raster layer 600x600
Flood fill white
open frame of choice
I am using acrylicframe2
copy and paste as new layer
resize by 80% and center
copy and paste tube of choice as new layer
mirror and resize up by 115%
Move to the right of the frame and below the frame
go to selections, Modify and expand by 10
highlight your tube layer
selections invert and hit delete
Take the settings on your tube to luminance legacy
opacity down to 69%
Now open up the paper of choice
I am using solidblack paper
Copy and paste as new layer, move below your tube layer
highlight your frame layer
grab your magic wand and click inside the frame
Go to selections, modify expand by 10
highlight your paper layer, selections invert and hit delete
Copy and paste your tube layer once again
Moving above your frame layer to the left
Open up another paper
I am using purple solid paper
copy and paste as new layer
Moving above your white background
Open up your mask of choice I am using Mask 88
Go to layers, New Mask layer, from Image
Merge group
Now to your elements
Open up purpleblue flower copy and paste as new layer
Resize by 65%
Duplicate, Mirror and flip
Move below your tube layer
Open up your bluegemstar
copy and paste as new layer
Moving right above your mask group
Add your copyright, name, save and your done
I would love to see your results. You can send them to me at
scrapsbysamantha@gmail.com
Sunday, August 30, 2009
Sweets
Another New Tut, Using a brand new kit Sweet Treats by Sarah @ Pimp My Tags with Scraps
Art work by Elias Chatzoudis you can purchase his tubes at Here
Do not use with out a proper license.
PSPX2 ( any version will work)
Mask 236 by Weescotslass Creations You can get it Here Leave alittle love when you snag
Font of Choice I am using AlexBrush
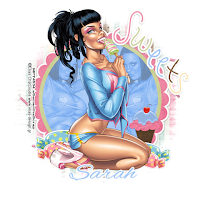 y Tags W/Scraps
Lets Begin
Open a new raster layer 650x650
Flood Fill white and rename Background
We will resize it later
Open your tube and minimize it we will come back to that
Open your frame. I am using circle frame
copy and paste as new layer
Resize it by 75%
Now go to your tube. I am using 2
The first one is Annet By Elias Chatzoudis
copy and paste
move below your frame
Highlight your frame layer and grab your magic wand
with your magic wand click inside the circle
Go to Selections modify and expand by 7
Highlight your tube layer
Then go to Modify, invert and delete
You will need to change your setting to Luminance
and take your transparency to 33 %
Duplicate and mirror
Now open up a paper of choice
I am using pp6
Copy and paste as new layer
Move it below your tube layer
Highlight your frame layer and grab your magic wand
with your magic wand click inside the circle
Go to Selections modify and expand by 7
Highlight your tube layer
Then go to Modify, invert and delete
Grab your second tube
I am using Ilikeit
copy and paste as new layer
Place her in the center
Open another paper of choice
I am using pp8
Move above your background
Go to layers and load mask I am using WSL_mask236 by
Load your mask and Merge group
Open up a confetti or the sprinkles of choice
I am using pink sprinkles.
Copy and paste as a new layer
move above your mask group and resize by 90%
Open up your ice cream cone
Copy and paste as new layer
Move it to the top
resize it by 50%
Now move below your tube and move to the right.
See mine for placement
Open your sticker sweet
copy and paste as new layer
resize my 90%
Free rotate 45% to the right
Move to the top right ( see mine for placement )
Open up a candy pieces
copy and paste as new layer
resize by 80%
move to the bottom left under your tube
Duplicate and mirror
Now open the second candy piece
Copy and paste as new layer
resize by 50%
Move below your tube
Below your first candy piece
Duplicate and Mirror
Add your copyright, name
Resize all layers by 80%
and save
Send your results to me @ scrapsbysamantha@gmail.com
I would love to see them :)
Art work by Elias Chatzoudis you can purchase his tubes at Here
Do not use with out a proper license.
PSPX2 ( any version will work)
Mask 236 by Weescotslass Creations You can get it Here Leave alittle love when you snag
Font of Choice I am using AlexBrush
 y Tags W/Scraps
Lets Begin
Open a new raster layer 650x650
Flood Fill white and rename Background
We will resize it later
Open your tube and minimize it we will come back to that
Open your frame. I am using circle frame
copy and paste as new layer
Resize it by 75%
Now go to your tube. I am using 2
The first one is Annet By Elias Chatzoudis
copy and paste
move below your frame
Highlight your frame layer and grab your magic wand
with your magic wand click inside the circle
Go to Selections modify and expand by 7
Highlight your tube layer
Then go to Modify, invert and delete
You will need to change your setting to Luminance
and take your transparency to 33 %
Duplicate and mirror
Now open up a paper of choice
I am using pp6
Copy and paste as new layer
Move it below your tube layer
Highlight your frame layer and grab your magic wand
with your magic wand click inside the circle
Go to Selections modify and expand by 7
Highlight your tube layer
Then go to Modify, invert and delete
Grab your second tube
I am using Ilikeit
copy and paste as new layer
Place her in the center
Open another paper of choice
I am using pp8
Move above your background
Go to layers and load mask I am using WSL_mask236 by
Load your mask and Merge group
Open up a confetti or the sprinkles of choice
I am using pink sprinkles.
Copy and paste as a new layer
move above your mask group and resize by 90%
Open up your ice cream cone
Copy and paste as new layer
Move it to the top
resize it by 50%
Now move below your tube and move to the right.
See mine for placement
Open your sticker sweet
copy and paste as new layer
resize my 90%
Free rotate 45% to the right
Move to the top right ( see mine for placement )
Open up a candy pieces
copy and paste as new layer
resize by 80%
move to the bottom left under your tube
Duplicate and mirror
Now open the second candy piece
Copy and paste as new layer
resize by 50%
Move below your tube
Below your first candy piece
Duplicate and Mirror
Add your copyright, name
Resize all layers by 80%
and save
Send your results to me @ scrapsbysamantha@gmail.com
I would love to see them :)
Subscribe to:
Posts (Atom)
My Blinkie ☆