About Me ☆

Hello, I am Sami, the Girl behind Guilty Pleasures. I have been
writing tutorials since May 22, 2009. My first tutorial was called Twilight Obsession. How I got my name is simple. I found tagging to be my Guilty Pleasure. I thought it fit perfectly. I am a designer as well. You can find links to my blogs on my top menu. If you have questions please feel free to ask. Other wise you can read more about me on my
ABOUT ME PAGE!
My Blogs☆

Store Manager ☆

CT Manager☆


Favorite Blogs ☆


My Hangouts☆


Wednesday, December 8, 2010
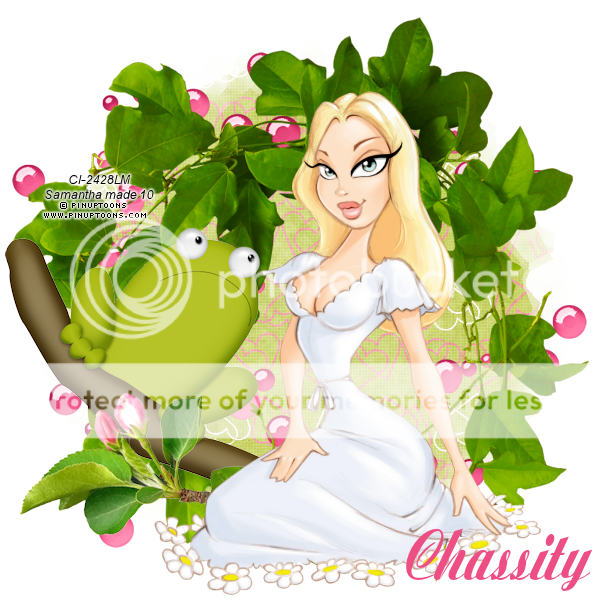
Heart Felt - PTU

You can Purchase her kit at So Sweet Scraps
tubes by Keith Garvey purchase them and a lisence to use at MY PSP TUBES
Create New raster layer 650x650
open frame 2 copy and paste as new layer
open tube copy and paste as new layer
Duplicate frame layer
Move about tube layer
Erase parts of frame that covers the top of the tube
open paper 3
Move below all other layers
This is going only in the center of the frame
So grab your eraser and erase around the frame
open glitterword art2
copy ans paste as new layer
Move below all other layer
Erase the pink from below the frame
Duplicate and mirror.
You want it at the top and bottom
open flower 3
copy and paste as new layer
Move Above all other layers
duplicate flower
Mirror and flip
Add your name, copyright, save and your done
Tuesday, November 9, 2010
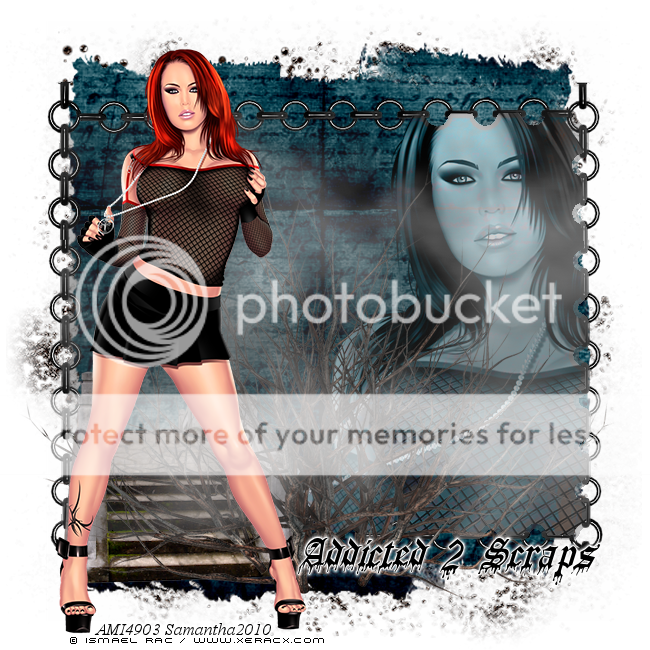
Rac Addict - PTU

New Tutorial Featuring Rac Addict By Crystals Creations.
You can purchase this Kit and others at Scrappin Warehouse
Scrap Kit Rac Addict by Crystals Creations
tubes by Ismael Rac purchase them ans a lisence to use ay his Store Xeracx Store
Template is 196 by Ali You can get it at Designs By Ali
Open Template Hold shift+d To duplicate
Close the origional
Canvas Resize by 800x800
We will crop out the unwanted
Open your tubes..
I have chosen 3 From Rac
2 close ups and 1 full body pose
now open 3 papers
I have chosen 11 9 and 6
Copy and paste paper 9 as new layer into the template
drag down between raster layer 9 and 4.
Grab your magic wand and click inside of the circle on rster layer 4
go to selections Modify invery and highlight the paper layer and hit delete.
Copy and paste paper 6
Move between raster 7 and 3
Grab your magic wand and click inside of the retangle on raster layer 7
go to selections Modify invery and highlight the paper layer and hit delete.
do the same for the oposite side.
Grab your close up tubes adn repeat the same steps as with the paper
But using your close up layer tubes..
grab the close up of ur full length tube
Copy and paste as new layer
She is going in the center of the big circle..
add a lumanice legacy to all the tubes
and take the transparency down on the center one.
I colorized the frames of the template,
you can leave them the way they are or use papers
Grab your full body tube Copy and paste as new layer
Put her in the center..
Duplicate and move above all other layer
Move the other below raster layers 5 and 6
Grab your eraser and highlight the duplicate tube later
Carefully erase the part of her leg on the white..
So it looks like mine
Colorize raster layer 6 to match the rest
GRab your Rings, Black, Purple and Blue
Copy and paste as new layer
Moving below all other layers and move them around as needed
open your black fire copy and paste as new layer
Move above the intercircle tube
go to selections Modify invery and highlight the fire layer and hit delete
take the opacity down
Add other elements of choice
add your name copy right and save
Crop out any unwanted space and resize to the size of choice.
This tutorial was written by Samantha on 9 November 2010. Any Similarities to this is complete coincidental.
tubes by Ismael Rac purchase them ans a lisence to use ay his Store Xeracx Store
Template is 196 by Ali You can get it at Designs By Ali
Open Template Hold shift+d To duplicate
Close the origional
Canvas Resize by 800x800
We will crop out the unwanted
Open your tubes..
I have chosen 3 From Rac
2 close ups and 1 full body pose
now open 3 papers
I have chosen 11 9 and 6
Copy and paste paper 9 as new layer into the template
drag down between raster layer 9 and 4.
Grab your magic wand and click inside of the circle on rster layer 4
go to selections Modify invery and highlight the paper layer and hit delete.
Copy and paste paper 6
Move between raster 7 and 3
Grab your magic wand and click inside of the retangle on raster layer 7
go to selections Modify invery and highlight the paper layer and hit delete.
do the same for the oposite side.
Grab your close up tubes adn repeat the same steps as with the paper
But using your close up layer tubes..
grab the close up of ur full length tube
Copy and paste as new layer
She is going in the center of the big circle..
add a lumanice legacy to all the tubes
and take the transparency down on the center one.
I colorized the frames of the template,
you can leave them the way they are or use papers
Grab your full body tube Copy and paste as new layer
Put her in the center..
Duplicate and move above all other layer
Move the other below raster layers 5 and 6
Grab your eraser and highlight the duplicate tube later
Carefully erase the part of her leg on the white..
So it looks like mine
Colorize raster layer 6 to match the rest
GRab your Rings, Black, Purple and Blue
Copy and paste as new layer
Moving below all other layers and move them around as needed
open your black fire copy and paste as new layer
Move above the intercircle tube
go to selections Modify invery and highlight the fire layer and hit delete
take the opacity down
Add other elements of choice
add your name copy right and save
Crop out any unwanted space and resize to the size of choice.
Thursday, October 28, 2010
Feel The Music
New Tut Featuring a FTU Kit by Rieka Rafita

This Tutorial is featuring the
You can download this kit at Creative Misfits Blog
Mask 7 By Rieka Rafita Download Here
Feel The Music word art by ME Download Here
*Remember when downloading freebies Always leave some love for the creators. *
Tube is By Elias Chatzoudi. Please do not use his work without a proper liscence to do so..
You can purchase his work and a liscence to use at MY PSP TUBES
Font used is AridITC ( I do not remember where it came from )
open frame 1 copy and paste as new layer
Resize by 70%
Duplicate the frame layer
Open your tube copy and paste as new layer
Move your duplicated frame layer over your tube..
Grab your eraser and erase the part of the frame that covers her.
open paper 4
copy and paste as new layer
move below all other layers
Open your mask
make sure your paper layer is highlighted
Go to layer, new mask layer from image.
Make sure that source luminance is checked
Merge mask group
Move down just a little bit
Open the black glitter splat
copy and paste as new layer
Move above your mask layer
Resize by 70 move to your liking
duplicate.. Mirror and flip
Open your musical note1
copy and paste as new layer
Move above all other layers and Resize down by 80%
Open your Record
copy and paste as new layer
Resize down by 40 % and then again by 80%
Duplicate and move up alittle and v drag both below the Music notes
Open your Martini glass
copy and paste as new layer
resize down by 40%
Free rotate left by 20
Duplicate and mirror, move over top of the other
Like Mine
Open your speaker copy and paste as new layer
resize down by 50%
Move below your records
Move all around accordingly.
Add your name and copyright, save and you are done
Tuesday, October 19, 2010
Take Care Be Aware
Beth of Angelic Posers invited me to join her CT Team
I accepted.. She is a sweetheart and her posers are awesome
Here is a tag done with Her BCA Poser..
She is adoreable


Monday, September 20, 2010
Tanted Love

This tutorial was written on September 20, 2010 by Samantha
This is using my own creativity and imagination any resemblances is completely
coincidental
Tube by Ismael Rac
Create new Raster Layer
600x600
Open Roundframe 1
copy and paste as new layer
resize your frame down by 75%
Open your tube
copy and paste as new layer
drab below your frame layer
highlighting your frame layer
grab your magic wand and click inside the frame
go to selections, Modify and expand by 3.
Highlight your tube layer
Go to selections invert and hit delete..
Open paper of choice.
I am using Paper 11
Copy and paste as new layer
Move below all other layers
highlighting your frame layer
grab your magic wand and click inside the frame
go to selections, Modify and expand by 5.
Highlight your Paper layer Go to selections invert and hit delete..
Duplicate your frame
Open your tube again Copy and paste as new layer
Move below duplicate frame layer
With your tube layer highlighted
Grab your eraser and erase the part of the tube that
is below the frame
Highlight your duplicate frame layer
Erase the part of the frame that is covering the top of the tube
Open your Lightfantasy
copy and paste as new layer
Move below all other layers
Open the rose
Copy and paste as new layer
Resize by 60
Moving to the top
See mine for placement
Add your name
copyright and save
IT IS A SIMPLE BUT ELEGANT TAG

Friday, July 2, 2010
My Lil Paradise
This is a fabulous kit by 2 very talented designers
came together to bring us My Lil Paradise
You can purchase this kit @ SATC
Tube of Choice.
I am using a new tube created by Ismael Rac.
You can purchase his tubes and a license to use @
His Store. Please remember to follow all TOU


This tutorial was written on 2 July 2010
by Samantha any similiarities is completely coinicidental.
New raster layer 750x750
open lp-clusterframe 4 by Sky
copy and paste as new layer
resize donw by 90
Open tube
copy and paste as new layer
open LP sand 3 by Sky
copy and paste as new layer
Move below your tube
open your mesh 2 by sky
copy and paste as new layer
resize by 90
duplicate and mirror
move below all other layers
open lp paper 7 by sky
copy and paste as new layer
move below your cluster frame.
Grab your magic wand and click inside
the cluster frame
Go to selections, modify and expand to your liking
Invert
Highlight paper layer and hit delete
open your cocktail by Jill
copy and paste as new layer
Resize by 50 %
Mirror and move below cluster frame
Duplicate the cluster frame and move above the cocktail
Grab your eraser and carefully erase the parts of the
frame that overs your glass.
See mine for reference.
open your flipflops by Jill
copy and paste as new layer
Resize by 50 and move above your cocktail glass
open string 1 by jill
copy ans paste as new layer
Move below all other layers
Add your name
copyright and save
You are done.
Sunday, June 27, 2010
Emotional
Something a bit different..
Than my usual.
Written by Me Samantha on 27June2010

scrap kit by Stacie Cakes
an image of your self or daughter
I am using myself..
New raster later 750x750
Open paper 19
copy and paste as new layer
hide that layer
open frame 1
copy and paste as new layer
resize down by 80%
open your poser
copy and paste as new layer
Move to the right hand side of the frame
open your purse element
resize down by 50%
see mine for placement
open element ipod2
copy and paste as new layer
resize to your liking and see mine for placement
open your misc elements
copy and paste as new layer
Move below all other layers
Back to your paper layer
unhide it..
I am leaving it alone
open your stargem element
copy and paste as new layer
Move above all other layers
Duplicate and move both to the bottom left.
open your boot
copy and paste as new layer
resize down by 65%
Move above your purse layer
placing where i did mine
Add your name and what ever else you wish
Dont forget your copyright.
Save and your done
Monday, June 14, 2010
Paparazzi

This tutorial was written on June 14, 2010 by Samantha
Using my own creativity and imagination and similarities is completely coincidental.
Scrap kit Paparazzi by Angel Designz
Tube by Keith Garvey You can purchase his work @ MPT
No outside masks used.
Create new Raster Layer 650x650
open frame 8
copy and paste as new layer
resize down by 80%
open city scape 2
copy and paste as new layer
Move below all other layers
grab your magic wand
highlight the frame layer
click inside the frame
Once you have your marching ants
Go to selections modify
And expand by 3
highlight your cityscape
go to selections
And invert and hit Delete
Open paper14
copy and paste as new layer
Move below your cityscape
grab your magic wand
highlight the frame layer
click inside the frame
Once you have your marching ants
Go to selections modify
And expand by 10
highlight your paper layer
go to selections
And invert and hit Delete
Open glittersplat 3
copy and paste as new layer
Move into position and move
your paper layer
Duplicate and move into differet positions.
Open your tube
copy and paste as new layer
Move above all other layers
Placing in the center
open your phone
copy and paste as new layer
resize to your liking and free rotate to the left
by 21
open clutchpurse2 copy and paste as new layer
resize to your like and move above your cellphone
Below your tube
Open your Camera1
copy and paste as new layer
resize to your liking
Mirror and move below your tube layer
open your sparkles
copy and paste as new layer
resize to your liking
move below your tube layer
open your word art 5
copy and paste as new layer
see mine for placement
Add your name, copyright and save. Your complete.
I would love to see your results just send them to me at
babygirl_0242002@yahoo.com. PLEASE PLACE
DND-TUTORIAL RESULTS in the subject so i do not delete it.
XOXO,
Samantha
Saturday, June 5, 2010
Rock and Roll

by my own imagination and creativity. Any copies of this is
purely coincidental.
Scrap Kit by PSP Girl - heart rock cafe
purchase @ Your Scrap Addiction
no Outside tubes or filters used
create new raster later 700x700
open element7
copy and paste as new layer
open element 40
copy and paste as new layer
move below all other layers
carefully erasing un wanted parts
open element 8
copy and paste as new layer
move above all others
resize down by 70%
Move sure its sitting on the stage.
open element 5 copy and paste as new layer
open your tube
copy and paste as new layer
Move to the left of the stage
above all other layers
oprn element 1
copy and paste as new layer
Move below your tube layer
Add your name copy right and save
Your done.
Friday, May 28, 2010
Kiss Me Fool
Scrap Kit by Polkadot Scraps
You can purchase this kit @ Twilight Scraps
Tube of choice. I am using the Pinup Toons.
You can purchase them and a license to use @ CILM
Mask 209 by Weescotslass Creations
This tutorial was written on 28May2010 by Samantha
All similarities to this is completely coincidental.
CREATE NEW RASTER LAYER 600x600
open element31 Copy and paste as new layer
Open tube copy and paste as new layer
move above the element layer
Open paper 12
copy and paste as new layer
Move below all other layers
go to layer
Load and save mask
I am using mask 209
merge mask group
open element5
copy and paste as new layer
move below your tube
resizing by 60%
open element 39
Copy and paste as new layer
move above your mask layer
open element 21
copy and paste as new layer
resize by 80%
move below your tube
see mine for placement
Add name and copyright and save
Tuesday, May 18, 2010
Chained to Pain

PTU Scrap Kit Chained to the Pain by Gothic Inspirations.
create new raster layer 750x700
Open your film strip and copy and paste as new layer
open poser 1 copy and paste as new layer
we are going to put a piece of her into each section of the frame
I duplicated her 3 times
and placed each layer below the frame
THe way i wanted it.
Grab your magic wand and select inside of each section of the
frame, go to selections, modify and expand by 2
Invert and delete each of the tube layers
open your black parchment
copy and paste as new layer
move below all others.
Resize up as needed and
carefully erase the parts that are not below the frame
Merge all three sections of Poser 1
and add a luminance legacy to those..
open your ball and chain
copy and paste as new layer
Resize up as needed
duplicate and paste on the top and bottom of the frame
open poser 2
copy and paste as new layer
resize down by 75%
Move above all other layers and on top of the frame.
To where she is laying on it..
open your teaser copy and paste as new layer
resize down by 75%
Move below the bottom ball& Chain
Duplicate and mirror
Open your BDSM Work art
copy and paste as new layer
Resize to your liking.
See mine for placement.
add your copyright and name
Save and your complete.
Wednesday, May 12, 2010
All My Love
CREATIVE ADDICTIONS EXCLUSIVE TUTORIAL

You can find this tutorial Here
Remember you dont have to be a member to view
the tutorials on Creative Addictions..


Friday, May 7, 2010
Glamourous

Supplies Needed
ScrapKit Glamour Girl by Grunge & Glitter
You can purchase her kit here
Tubes by Keith Garvery
you can purchase his work here
This tutorial was written on 7May2010 by Samantha.
Any similarities is completely coincidental.
Create new layer 700x700
open frame 1 copy and paste as new layer
Resize down by 80%
open both of your tubes.. I am using 2
that have close up layers
Grab one close up layer
copy and paste as new layer
move below your frame layer
Grab your magic wand
and select in the one side of the frame
invert and hit delete.
Do the same with the second tube
Open paper 14 copy and paste as new layer
move below the tube layers
Highlight the frame layer
grab your selection tool
click inside both sides of the frame
Go to selections, modify and expand by 5
Highlight the paper layer and go to selections
invert and hit delete
Highlight tube layer 1
and make it Luminace legacy.
do the same for the other
open doodle 3
copy and paste as new layer
resize by 75%
Move below all other layers
duplicate and flip
open element cluster
copy and paste as new layer
Resize by 80
move above all other layers
place in the center of the frame
open your full size tube
copy and paste as new layer
I used both..
Place on each side of the frame
Add name and copyright dont forger to save.
Your done. I would love to see results.
Please feel free to send them my way.
Wednesday, April 28, 2010
Unlikely Ballad
Scrap kit By Polkadot Scraps. Unlikely Ballad is a PTU kit
You can purchase this kit here
Tube is the art work of Ismael Rac. You can purchase his work
and a license to use at Artistic Minds Inc
Mask128 by Weescotslass Creations

This tutorial was written on 27 April 2010 by Samantha
Any similarities to this is completely coincidental
Create New raster layer 700x700
You can resize it later if you would like.
open frame 2 copy and paste as new layer
Open your tube copy and paste as new layer
Duplicate your frame and move one above the tube layer
Grab your eraser and carefully erase the bottom that is sticking out
from the frame . Once you have that done, hightlight the duplicate frame
layer and erase the part of the frame that covers the hair.
Open paper 1 copy and paste as new layer
move below all other layer
go to Layer load/save mask and open your mask of choice
Merge Mask group
Open element 16 copy and paste as new layer
Free rotate to the left by 10
Move to the left of the frame
Open element 14 copy and paste as new later
Move to the bottom left ( see mine for exact placement)
Open frame 6 copy and paste as new layer
move above your mask group
Grab your eraser and carefully erase the parts that is
on the inside of frame 2
Open elements 35 and 36
copy and paste both as new layer
Resize element 35 down by 30 % and move to the
bottom right of your frame
Resize element 36 down by 30% and move to
the right of element 35 Duplicate element36 and
place on the other side of element 35
( see mine for exact placement )
Add your name, Copyright and save your done.
Monday, April 19, 2010
His Lullaby
his Beautiful Kit is by Polkadot Scraps.
It is a PTU Kit. You can purchase this @ Twilight Scraps

Tube is a Zindy Free Tube. You can get Here
It is a PTU Kit. You can purchase this @ Twilight Scraps
Tube is a Zindy Free Tube. You can get Here
This tutorial was written on 4.19.2010 by Samantha by my own thought
Any similarities is completely coincidental
Create new raster layer 700x700
Open frame 7
copy and paste as new layer
Open your image
copy and paste as new layer
Move below your frame
Megre Down
resize down by 80%
Open element 5
copy and paste as new layer
Move below all other layers
add a drop shadow of choice
open paper 6
copy and paste as new layer
move below all others
Go layers load/save mask.
I am using Mask147 by Weescotslass creations
open element3
copy and paste as new layer
resize by 70%
then again by 60%
Move to the bottom left
open element 1
copy and paste as new layer
resize by 50%
Move infront of your paprer layer
to the bottom left
open element 55
copy and paste as new layer
move below the piano and music later
move to the left (see mine for placement)
open element 51
copy and paste as new layer
Move to the bottom
Add your name and copyright Save and your Done
A simple but Elegant tag
Saturday, April 17, 2010
Elegant Romance
It is a FTU Kit. No outside tubes or Masks Used.
Create new Raster layer 650x 650 open your fram cluster
copy and paste as new layer
reszie down by 20%
open paper 4
copy and paste as new layer
Move below the frames
Grab your magic wand and
click inside of the frames
ONE BY ONE
Go to selections, modify and expand by 7
Go to selections invert
Highlight your paper layer and hit delete
grab your dark swan
Copy and paste as new layer
Place different areas in easch part of your
frames
Add a luminance legacy to those.
open doddle 2
copy and paste as new layer
moving below your paper layerv in the center
open stardust
copy and paste as new layer
move to the top right below your paper
Duplicate and mirror
open poser2
copy and paste to ur liking
Placing in the center
open the flowers with the bow
copy and paste as new layer
resize to ur liking
Free rorate left by 90
Move to the left
Add your name and copyright ur done
Wednesday, April 14, 2010
Last Birthday
Scrap Kit by Brandi @ Grunge N Glitter
Her Kit Last Birthday is a PTU kit. Its on Sale for 1.99 @
Her Store.
Tube of choice. I am using the Work of Elias Chatzoudis
You can purchase his beautiful work and a license to use @
Font is TheNautiGirl

This tutorial was written by Me on 14 April 2010
any copies is completely coincidental. From my own hyper imagination
Create new raster layer 750x750
We can resize it later
Open Ribbon frame
copy and paste as new layer
resize down by 60
open close up layer of tube
copy and paste as new layer
move below frame
Grab your eraser and carefully erase
what is sticking out from the frame
open paper5 copy and paste as new layer
move below all other
Go to layer
load/save mask from disk
I am using Mask 219 From Weescotslass Creations
Merge mask group.
Resize mask layer down by 80
highlighting your tube layer
add a luminance Legacy to that
open your hearts and glitter
copy and paste as new layer
Move Below your Mask layer
Duplicate Frame Layer and hide the
duplicated layer
Merge the ribbon frame and
close up tube and
Mirror
Open your tube again copy and paste
as new layer
unhide ribbon and move below the tube
duplicate ribbon frame again and move above
the tube layer
Place to the right
Like mine
Grab your eraser
highlight your tube layer and
erase the parts of the tube below the frame
Now hightlight your other ribbon and
erase the parts that are coving the tube
open your cake
copy and paste as new layer
resize by 40%
Move to the blottom left
open gift 1
copy and paste as new layer
resize down by 30%
Move to the right of the cake
Open gift2
copy and paste as new layer
resize down by 30
move beside the other one..
Open all 3 balloons
copy and paste as new layer
Resize the first by 50
Second by 40 and the 3rd by 30
Place behind the cake layer
See mine for exact placement
open your tag 1
copy and paste as new layer
resize down to your liking
Place infront of your cake and presents
Add your name and copyright
Save and your complete
Thursday, April 8, 2010
Vindictive Pleasure
So this one I was playing around with and It come out..
I love how it turned out.. Unfortunately I have no tut for it yet.
But hopefully soon..

Scrap kit is PTU from Gothic Inspirations
You can purchase it in her Store
Vindictive 1
This is Tutorial 1 with a New PTU kit by Gothic Inspirartions
You can purchase this beautiful kit at her New Store
Tube is the beautiful art work of Elias Chatzoudis.
You can purchase his work here
Create New raster layer 600x600
Open frame 2
copy and paste as new layer
open your tube
grab the close up layer copy and paste
Move below your frame layer
Grab your eraser and carefully erase
the part of the tube that is below the frame
Open paper 13
copy and paste as new layer
move below your tube layer
Go to layers Load mask from disk
Choose your mask and merge group.
I am using Vix_mask148 you can download from http://www.freewebs.com/vixpsp/masks.htm
Open your parchment
copy and paste as new layer
Move above the mask layer
Grab your eraser and carefully erase the
part that is on the outside of the frame
Open your leaves
Copy and paste as new layer
Free rotate right by 40%
Plce below your tube layer
Grab your eraser and erase the part of the
leave that is inside the frame
See mine for ideas.
Mirror and dupliate the leaves and erase those as well
Open your lamp post copy and paste as new layer
resize down by 70% and move to the right
above all layers
Open your potion bottle
copy and paste as new layer
resize to your liking and place to the right
at the base of your lamppost.
open your heart
copy and paste as new layer
Resize to your liking and move below the lamppost
add your name and copyright and save
Thursday, April 1, 2010
Miss Understood

SUPPLIES NEED
MISS UNDERSTOOD PTU KIT BY Grunge & Glitter
Tube by Keith Garvey
Mask 221 by Weescotslass Creations
This tutorial was written on April 1, 2010 by Samantha
All similarities to this is complete coincidental.
Create new raster layer 700x700
We can resize it later if you choose.
Open frame 5 copy and paste as new layer
Place in the center of your layer
Open your tube
copy and paste close up layer
Move below your frame layer
grab your eraser and hightlight the tube layer
carefully erase the parts of the tube that
are sticking out of the frame.
Open paper 17
copy and paste as new layer
move below your tube layer
go to Layers
Load/save mask
open mask of choice
once you get that done
Merge mask group
Now hightlight your tube layer
add a luminace legacy to it.
open your barbed wire
copy and paste as new layer
Free rotate left by 90
Move above all other layers
Resize by 65%
Place on the left side of your frame
Dupplicate and mirror
adjust if you need to
open heart 5
copy and paste as new layer
free rotate left by 22%
Resize by 40%
Move to the bottom left of the frame
open the key
copy and paste as new layer
resize by 405
Free rotate left by 22
move below your heart layer
open skull1
copy and paste as new layer
resize by 40%
Add a gradient glow and resize again by 70%
Move to the bottom right
Open your tube again.
Grab your full body tube
copy and paste as new layer
Mirror and place to the right..
Grab your text tool.
TYPE out MISS UNDERSTOOD
In a font of Choice convert to raster layer
Add a gradient glow.
Duplicate Move below your orgional text layer
Add a constellation to it.
Setting of choice
Add your copyright and name
Save and done
Monday, March 29, 2010
Easter Celebration

Addicted 2 Scraps PTU kit Spring has Sprung
Easter Template 9 From Tracy F @ Freebie Friend
Hit Shirt+D to duplicate
Close your original template
Canvas resize by 700x550
Delete your copyright layer
Select your rectangle
Grab your magic wand and click the
rectangle
copy and paste as new layer
Go to selections and invert.
Highlight your paper layer and hit delete.
Do the same thing with Paper 9 for
the oval layer
Open element2
copy and paste as new layer
Resize by 70%
Grab your magic wand and highlight
the circle layer
Click inside and once that is selected
Go to selections
Invert
highlight the element2 layer and hit delete
highlight your egg layer
Grab your magic wand and select it.
Open paper 12 copy and paste as new later Go to selection and hit invert then deleteOpen element 28
copy and paste as new layer
resize by 40%
Move above your rectangle later
and to the right
Duplicate it and Mirror
open element 37
copy and paste as new layer
Resize by 30%
Move Below the bunnies
Duplicate and mirror
Add your name and copy right and save.
Your done.
Friday, March 26, 2010
Thorns
Immortal Dreams has awesome scrap kits.
She is an awesome designer and I love her kits.
I had the pleasure to work with her Wicked Thorns Kit
Its a beautiful PTU kit.. You can purchase @ Scraps With Attitude
Poser used is by Lisa aka aka Sophisticated Sraps

This tutorial was written on 3/26/2010 by Samantha aka Sweet Indulgence
This is using my own creativity, any similarities is coincidental.
Create new raster layer 700x700
we will resize it layer
open frame 2 copy ans paste as new layer
resize down by 70%
open paper 6
copy and paste as new layer
move below your frame layer
grab yuor eraser and carefully
erase the part that is on the
outside of the frame..
open one of the posers and
copy ans paste as new layer
move above all other layers
Resize down by 50% and then
by 70%
open the crow
copy and paste as new layer
resize down by 20% and place
on the top of the frame
Open the blood
copy and paste as new layer
Move below all other layers
duplicate and mirror
place on the sides of the frame like mine
Hide the poser layer for
right now
Open the book
copy and paste as new layer
resize down by 15%
move to the left of the frame
free rotate left by 14 %
oen skull 2
copy and paste as new layer
resize down by 15%
Move above your book
Unhide your poser layer
Move down just abit
Open Blackrose 2
copy and paste as new layer
resize by 20%
Move below the book to the left
Open cross2
copy and paste as new layer
resize to your liking and
Move below the rose layer
See mine for placement
Add your name copyright and your done
resize to your liking and don't forget to save
Wednesday, March 24, 2010
I love Twilight
Scrap kit By Grunge &Glitter
You can purchase this kit @ GrungeandGlitter Store.
Tube is a Free to Use tube By Zindy S.D. Nielsen

Create new raster layer 600x600
Open frame2 Copy and paste as new layer
resize by 80%
open tube
hide the copyright layer
Make sure your Tube layer is highlighted
Copy and paste as new layer
Place the faces center of the frame
highlighting your frame layer
Grab your magic wand and select inside the frame
Go to Selections Modify and expand by 8
Highlight your tube layer
Go to selection and invert
Hit Delete
Open paper 7
copy and paste as new layer
Move below all other layers
Go to layers load/save mask.
I am using Mask 219 By Weescotslass Creations
Merge mask Group
open your doodle
copy and paste as new layer
Move below your mask layer
Duplicate, mirror and flip
Open your rose
copy and paste as new layer
resize by 50% and move to the bottom left
of your frame
Open your key
copy and paste as new layer
resize by 50 and then again by 60
free rotate to the left by 14%
See mine for placement
Open word art 5
Copy and paste as new layer
resize by 60%
Move to the bottom of your frame
Add your name and copyright.
Save and your done..
Monday, March 22, 2010
Touch of Night
This tutorial is featuring a brand new
scrap kit by Addicted 2 Scraps. It is PTU Kit
Tube by Ismael Rac. Do not use his work unless
you have a license to do so.
Create new raster layer 650x650
You can flood fill white but I
am leaving it with a transparent background
Open Element12
copy and paste as new layer
open your tube close up layer
Copy and paste as new layer
Grab your magic wand
Highlight the Element 12 layer
And select inside of it
Go to Selection, modify and expland by 5
highlight your close up layer
Go to selections invert and hit delete
Add a Lumance Legacy to that
Open Element1 copy and paste as new layer
Move behind all other layer
Now open element49
copy and paste as new layer
Resize by 50% and then again by 80%
move to the left hand side of element12
See mine for exact placement
Open element45
copy and paste as new layer
Move to the bottom and duplicate
move the duplicate layer toward the top
Highlight element 12 layer
grab your magic wand and select
go to Selections modify and expand by 10
Highlight the element 45 layer
and hit delete
Do the same with the duplicate layer
open element 47
copy and paste as new layer
move above the bridge layer
Placing in the center
It will have that old foggy look to it
Open element 34
copy and paste as new layer
Move below all other layer
Resize up to your liking
open Your full body tube
copy and paste as new layer
Placing to the left above all other layers
Add your name Copyright and your done..
do not forget to save.. Easter Morning
Scrap Kit by Gina.
It is a FTU kit that you can download from her blog
Tube by Elias Chatzoudis.
Do not use with out a license to do so.
Mask 226 by Weescotslass Creations

This tutorial was written by Samantha on 22March2010
any similarities to this is completely coincidental.
Create new Rater layer 600x600
open frame 1
copy and paste as new layer
resize down by 70%
open your tube close up
copy ans paste as new layer
Move below your frame
Grab your magic wand and select inside the frame
Go to selection, modify and expand by 5
Highlight your tube layer
selections, invert and hit delete
open paper 5
copy and paste as new layer
Go to layers, load and save mask
merge mask group
add a drop shadow to your mask group
open doodle2
copy ans paste as new layer
move below all other layers
duplicate and flip and mirror
open butterfly4
copy and paste as new layer
Mirror and resize down by 60%
See mine for placement
Open your full version of the tube
copy and paste as new layer
see mine for placement
Now go back to the tube that is below
the frame and add a luminace legacy to it
open candybunny1
copy and paste as new layer
resize by 60%
Move below yuor full tube
and place near the bottom of the frame
Open 3 of your eggs
I am using eggs 1,3,and 5
copy and paste all ass new layer
Resize all 3 eggs by 40% and then by 80%
Move below your candy bunny
Add your name and copyright
save and your done
Sweetest Times
Yes, another tutorial
Using a Fantastic Kit by Artlor Designs
Its a PTU Kit that you can purchase @ Your Scrap Addiction
Tube of is the work of Keith Garvey.
Do not use unless you have a license to do so
Purchase this and his work at MPT

This tutorial was written on 22 March 2010 by Samantha
This is completely my imagination. Any similarities is completely
coincidental..
Create new raster layer
600x600
Open frame 3
copy and paste as new layer
resize by 30 and then again by 50%
open paper 17 copy and paste as new layer
Move below your frame layer
Go to layer load/save mask
I am using Mask226 by Weescotslass Creations,
merge group
Open Your tube of choice.
Copy and paste as new layer
Move below your frame layer
carefully erasing the legs that are below
the frame
Now duplicate your frame
Move above your tube layer
erase the parts of the frame
that is covering her hands and head.
open bear 2
copy and paste as new layer
resize down by 20% and again by 50 %
Place bottom left of the frame
open your diamond bling
copy and paste as new layer
resize down by 20%
move above your mask layer
just below the bottom of your frame layer
open your heart bouquet
Copy ans paste as new layer
resize down by 20% and then again by 60
move to the top right
See mine for placement
open sparkle3 copy and paste as new layer
resize down by 20%
Move below your diamond bling
duplicate and mirror
Merge Sparkle layers
add a slight drop shadow
Add your name and copyright
save and your done..

Wednesday, March 17, 2010
Dark Beauty
This Beautiful tutorial is featuring a
wonderful scrapkit by Jessica @ Gothic Inspirations
It is part of February' s DarkCravings Blog Train. You
can get this kit here
can get this kit here
Artwork is By Ismael Rac.
Please do not use if you dont have a license to do so.
You can purchase his work and a license @ AMI .
Font is TheNautiGirl

This tutorial was written on 17March2010 by Samantha
This is completely my imagination.. Any similarities to this is completely Coincidental.
Create new Raster layer 600x600
open frame 3 copy and paste as new layer
open your tube copy and paste as new layer
move below your frame
Grab your magic wand
highlight your frame layer
select inside the frame
Once you see the marching ants
Go to selections, modify and expand by 9
highlight your tube layer
Go to selections, invert and hit delete
open your tagback grid copy and paste as new layer
resize down by 90%
Move below your tube layer
open paper 14 copy and paste as new layer
Move just about your tagback layer
Grab your eraser and carefully erase the paper
On the outside of the frame.
go back to your tube layer and Add Luminace Legacy to it
Mirror your tube
open the cross with ribbon copy and paste as new later
Resize down by 80 %
Move to the top left of your frame
Open your tube once again
Copy and paste as new layer
Make sure it is above all other layers
Mirror and move to the right
open the bloodsplatter
copy and paste as new layer
Move just above your tag back layer
Duplicate 4 times and place in the
4 corners of the frame
Add your name and copyright.
dont forget to save. Your done..
Wednesday, March 10, 2010
Shamrock Stalker

Ismael Rac happens to be one of my favorite
Tube artists. So I thought this was fitting.
This Tutorial was re written on March 10, 2010
BY Samantha. Any similarities to this is completely coinicdental.
Lets Begin
Scrap Kit is Stalkers St. Patricks Day
FTU Kit by Black Widows Creationz.
Tube by Ismael Rac. Remember to use his work.
You must first purchase it and a license to use at AMI.
Mask178 by Weescotslass Creations
Create new layer 600x600
Open frame 3
copy and paste as new layer
Make sure it is centered.
Open paper 5
copy and paste as new layer
Move below your frame layer
Open your mask
Go to layers
load mask from disk
merge mask group
open Mushrooms 1
copy and paste as new layer
place above your mask layer
Open tube of choice
copy and paste as new layer
Move above all other layers
move center right
Open potofgold1
copy and paste as new layer
move below your tube layer
Resize by 45%
Move bottom left
Open teddy1
copy and paste as new layer
resize 40%
Move infront of your pot of gold
Open hat 2
copy and paste as new layer
Resize by 60%
Mirror image
Move behind your pot of gold.
Add your name and copyright your done.
It did it this way so the copyright can be seen
Open frame 3
copy and paste as new layer
Make sure it is centered.
Open paper 5
copy and paste as new layer
Move below your frame layer
Open your mask
Go to layers
load mask from disk
merge mask group
open Mushrooms 1
copy and paste as new layer
place above your mask layer
Open tube of choice
copy and paste as new layer
Move above all other layers
move center right
Open potofgold1
copy and paste as new layer
move below your tube layer
Resize by 45%
Move bottom left
Open teddy1
copy and paste as new layer
resize 40%
Move infront of your pot of gold
Open hat 2
copy and paste as new layer
Resize by 60%
Mirror image
Move behind your pot of gold.
Add your name and copyright your done.
::NOTE::
The original tag does not have the white background.It did it this way so the copyright can be seen
Friday, February 26, 2010
Peas in a Pod
Another Tut using the 2 Peas in the Pod Kit
and the kit is exclusive to Scrappin' Bratz.
Artwork by Jasmine Beckett-Griffith.
Purchase at CILM .

This tutorial was written on 26 February 2010 by Samantha.
This is from my own creativity any similarities is completely coincidental.
Create new raster layer 600x600
you can flood fill white if you prefer. Open paper of choice
I am using GCZ_paper9
Copy and paste as new layer
Open SKD-Mat1
Go to layer/ New Layer mask
From Image
Select SKD_Mat1 from the list
Merge mask group
resize that by 85%
Open yout tube
copy and paste as new layer
She should be centered
open SKD_Frame4
copy and paste as new layer
Resize by 50%
Move top left slightly
Open SKD_Wordart
Copy and paste as new layer
resize by 40% Move to the
top of your frame
Open SKD_Leaf2
Copy and paste as new layer
resize by 80 %
Move below your tube layer
and Duplicate
Your tube should look like she
is sitting on the leaves
Open GCZ_flower1
Copy and paste as new layer
resize by 50%
Move below your tube above the leaves
duplicate and Mirror
Open SKD_Heart1
Copy and paste as new layer
resize by 50%
Free Rotate to the right by 25
See mine for placement
Add your name and copyright and save
2 Peas
I have the pleasue of being CT for
and the kit is exclusive to Scrappin' Bratz.
NO OUTSIDE TUBES USED
This tut was written on 26 February 2010 By Samantha
any similarities is completely coincidental.
Create new raster layer 600x600
you can flood fill white if you prefer.
Open SKD Heart2 copy and paste as new layer
resize by 70%
Move to the center
Open SKD_Heart copy and paste as new layer
resize by 70%
move toward the center but slightly lower than
the first one
open your GCZ _ Green splat
copy and paste as new layer
move below both heart layers
Now open your GCZ_pink splay
copy and paste as new layer
Moving above yuor green splat
go to image and fit flip.
adjust to ur liking
open GCZ baby 2
copy and paste as a new layer
resize by 60%
open GCZ grass
copy and paste as new layer
resize by 50%
Move to the bottom of the flower on your baby
Move behind the baby layer
Duplicate the grass and move up slightly
Make it to where it looks like they are sitting
on the grass Duplicate a third time if you need to
Add your name and your done..
I will be back with another featuring this great kit :)
Thursday, February 25, 2010
Irish Luck
A mini Tut featuring a great Irish Luck Kit by Addicted 2 Scraps
It is a FTU Kit. So if you download please Leave Lots of love
Tube used is Ismael Rac. You can purchase his work and a
license to use at AMI .
Mask178 by Weescotslass.

Create New raster layer 600x600
you can flood fill white, but I prefer transparent. Open paper 4
copy and paste as new layer
Open your mask as a new image
Go to layer, New Mask Layer, From Image
Open your mask of choice.
Merge Mask Group
open your tube
copy and paste as new layer
place in the center of your Merged Mask
open element 10 copy and paste as new layer
Move below your tube layer toward the bottom
Duplicate and mirror
open element 14
copy ans paste as new layer
move below your tube layer as well
Add Text of choice.
Copyright and your name
Save and your complete.
Wednesday, February 24, 2010
Candy Kisses
It is a pleasure to be working with Gina from
Ginas Gems Tuts N Stuff. She has great scrapkits.
This Tut is Featuring Her Pink Candy Kisses Scrap Kit.
You can purchase this Kit at Twilight Scraps.
Tube of Choice. I am using the Work of Keith Garvey.
You can purchase his work at MPT.
Mask178 by Weescotslass.

This tutorial was written by Samantha on 24February2010.
Any similarities to this is completely coincidental.
Create New raster layer 650x650
You can flood fill white but I choose to leave it transparent
Name this Background layer
Open Knotted Ribbon Heart Frame 1
Copy and paste as new layer
resize down by 80%
Open tube of choice
Copy ans paste as new layer.
I am using the Closeup layer first
Move below your frame layer
highlight the frame layer and grab your magic wand
Click inside the frame
go to selections, modifty and expand by 5
Highlighting your tube layer
go to selections and invert
Hit Delete
highlighting your background layer
Open a paper of choice, I am using paper 9
copy and paste as new layer
Open your mask as a new image
Go to layer, New Mask Layer, From Image
Open your mask of choice.
Merge Mask Group
Adjust your mask to where the heart is in the center
highlight your tube layer and add a Luminance Legacy to your tube.
Open your tube once again and grab a full size image
Copy and paste as new layer move above your heart frame
Go to image and mirror this layer
Move to the right
Open paper heart 4
copy and paste as new layer
resize down by 50 %
Moving below your frame layer
Add a free rotate to the left by 25
Open peppermint heart 1
Copy and paste as new layer
Resize down by 50%
Move below your frame layer
placing the bottom of the heart over
the bottom of the paper heart
open Teddy Bears 2 copy and paste as new layer
Resize down by 20 %
Move to the bottom of the frame
Open butterfly 6
Copy ans paste as new layer
resize down by 50 %
Move to the top left
Add your copy right and name
Dont forget to save.
Send me your results.
You can email them to
I would love to display them on my blog..
Subscribe to:
Comments (Atom)
My Blinkie ☆
